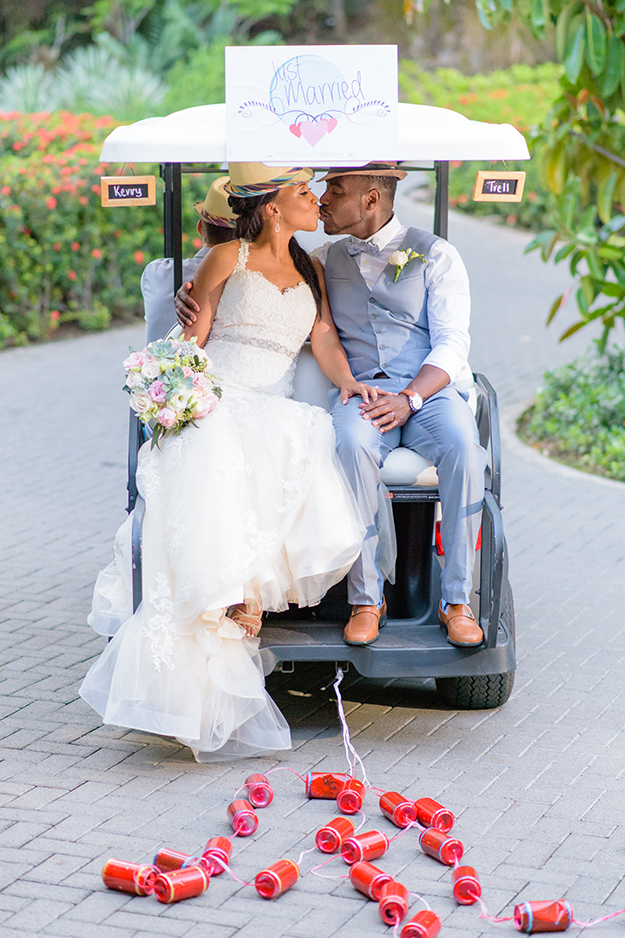
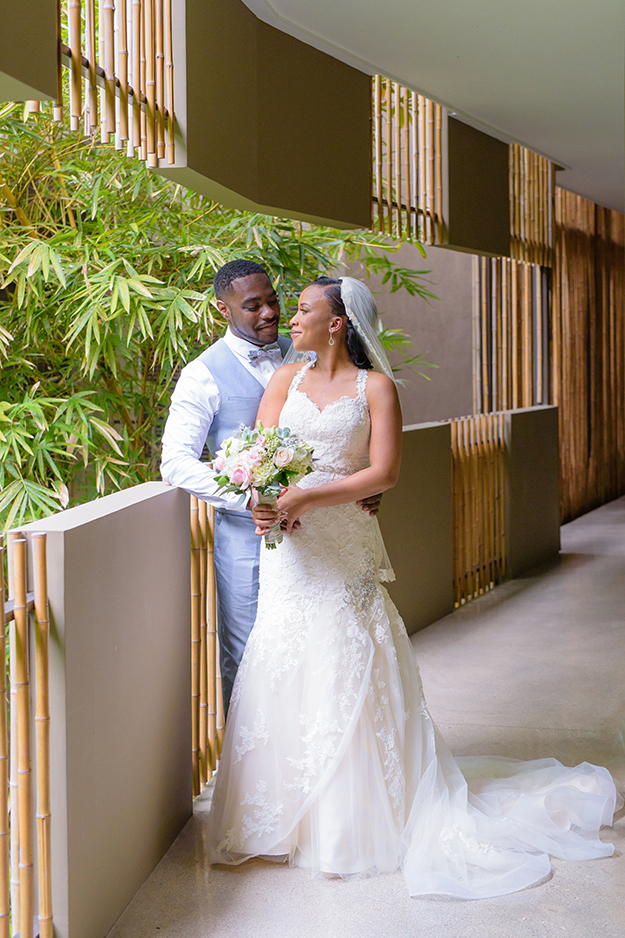
Hey guys! It’s our 4 year wedding anniversary (est. 10/15/16). To celebrate, I am sharing a few of our destination wedding pictures with y’all! It was a magical day and we couldn’t asked for a more perfect day. To be surrounded by family and friends meant the world to us. Hope you enjoy 🙂
We met in November 2013, got engaged in November 2014, and got married in October 2016. We knew we didn’t want to get married in Texas, so we started looking at a few spots in the Caribbean and in New York. We didn’t want to go somewhere that was too far to fly to, or somewhere that was super expensive because we had to keep in mind that our guests lived in different states and most have a family (small kids).
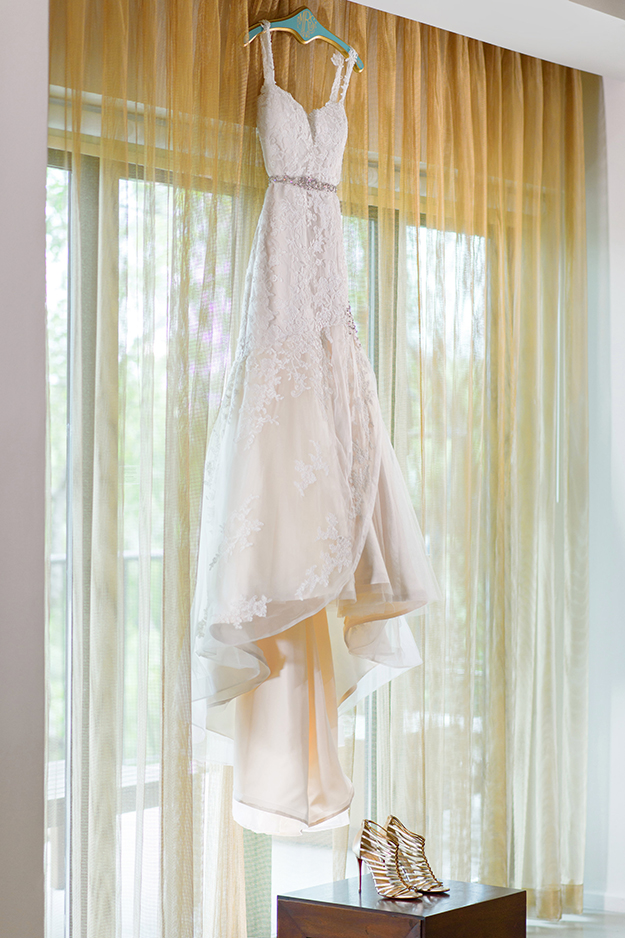
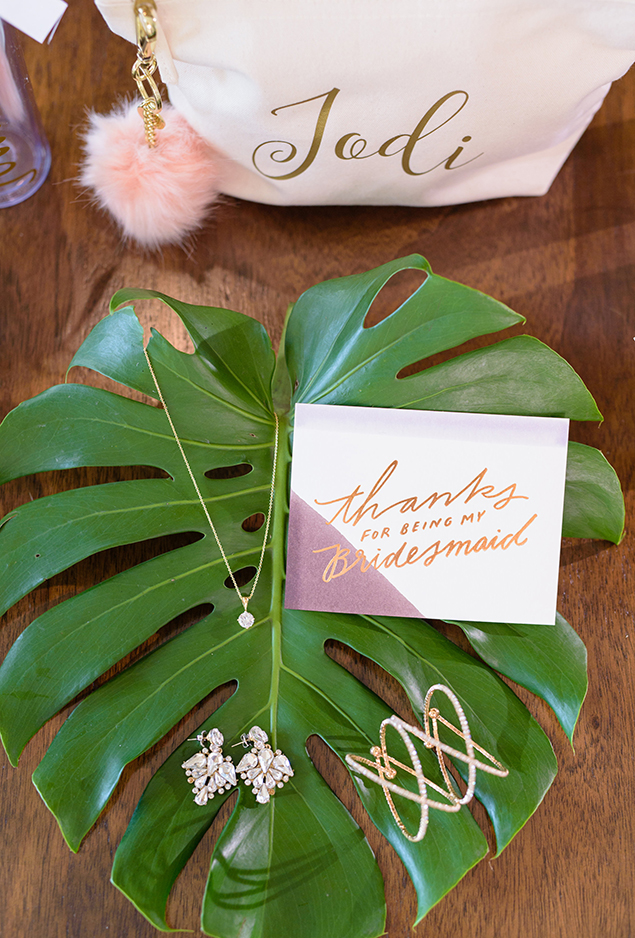
My wedding dressBridesmaids gifts
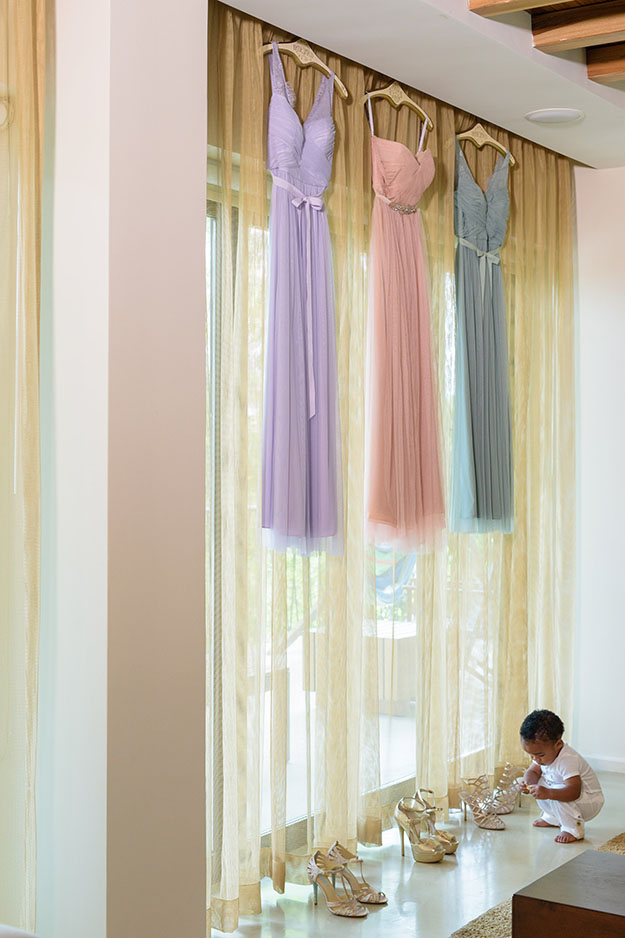
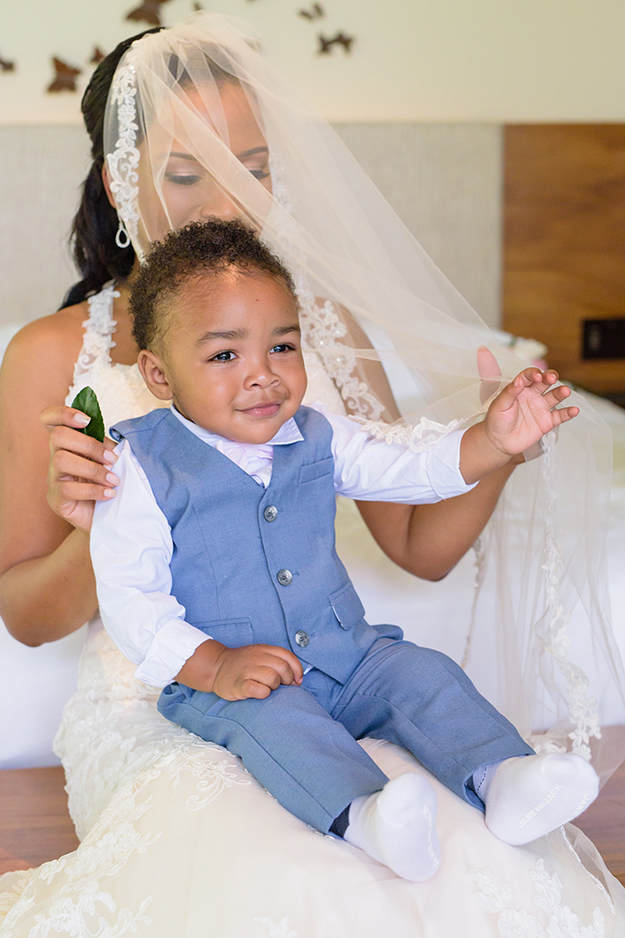
Pastel colors for my bridesmaids. Look at baby, Asher! He was one 🙂Customized welcome bag for our guests
After about two months of searching for venues, (including a trip to New York to visit venues) we found this gorgeous hotel in Costa Rica, and we immediately fell in love. We booked a trip within weeks to visit the venue and met with the event coordinator. The pictures of the property online didn’t do justice, it’s even more beautiful in person. That trip sealed the deal!
First Look One of my favorite pictures
My loveMy favorite picture. Look at my baby 🙂
Our wedding took about 9 months to plan, and it was a smooth process. We hired a local planner in Costa Rica and I flew in my hair & makeup artist. I used Etsy for all of the favors and programs. It was super important that my guests has an amazing time, and they did! I wish my wedding day lasted longer.
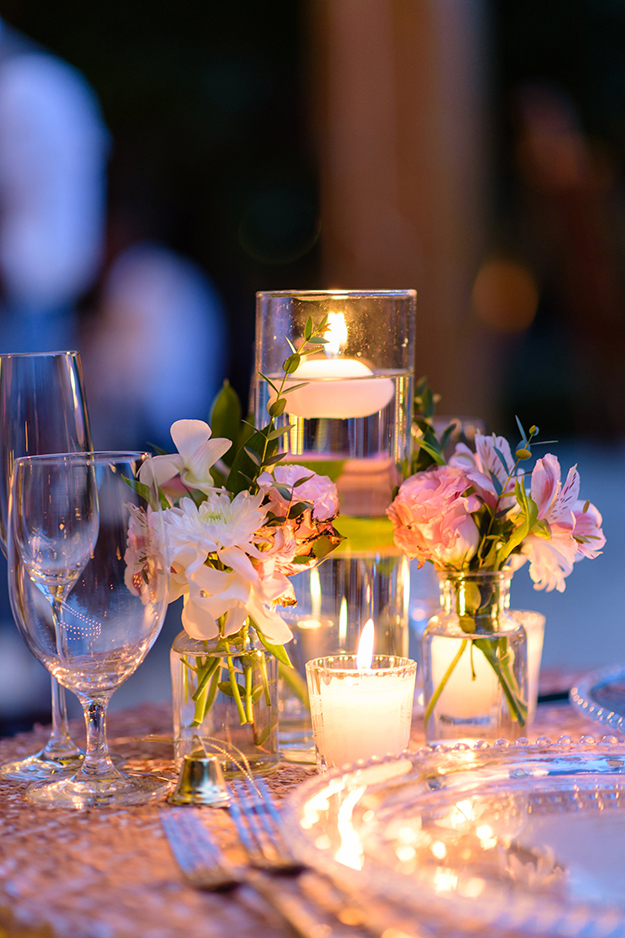
Table decor
Naked cake
That’s it y’all! Hope you enjoyed our destination wedding pictures. Will share more pictures for our next anniversary. Please subscribe to my blog and check out my other blog posts. Thank you so much for stopping by 🙂
Hey guys! In this post, I am going to share with you my upstairs loft decor and design process and progress. This project has taken a mighty long time, but it’s going to worth the wait. The smaller projects always take the longest time to complete. Do you agree? My goal is to finish decorating it by the end of 2019! Everything will be linked at the bottom of this post 🙂
This post contains affiliate links. All opinions are my own. Click here to shop my home!
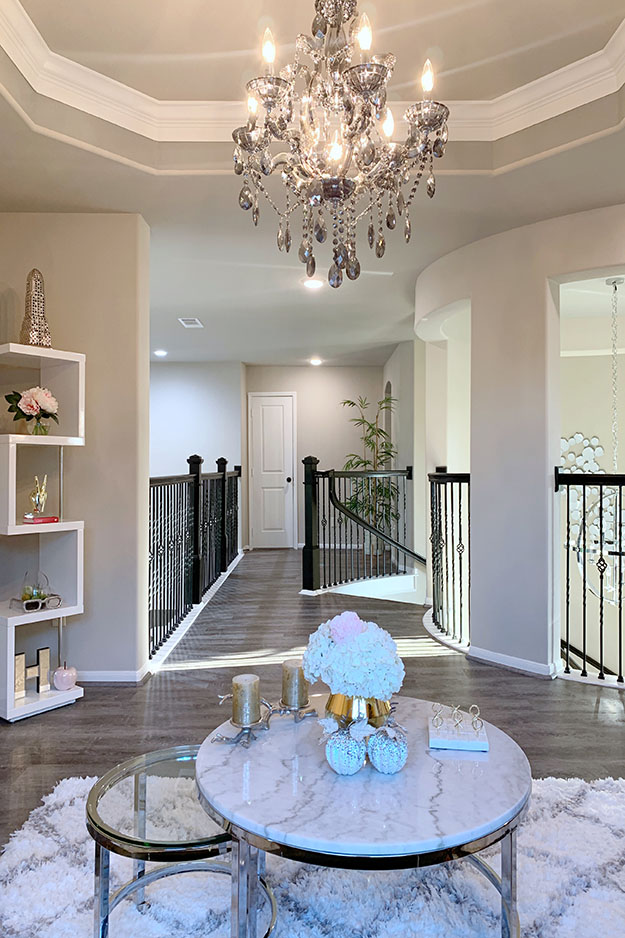
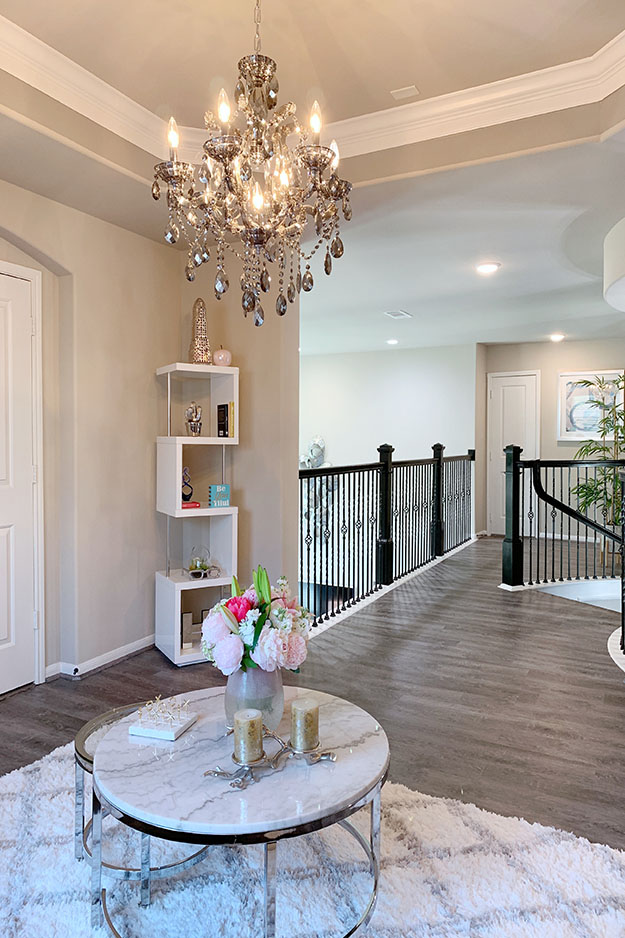
Here are a few before pictures. How ugly is that pendant light, lol. I knew I had to get a new chandelier and replace the carpet, which was a big expense for us. However, to achieve the look I wanted for this space, those changes were necessary and I have no regrets. We also painted the trim from that dark brown to downtown grey by Behr.
Here’s the after! What a difference, huh! First, we installed the same luxury vinyl floors (the color is Aspen) that we have on the first floor, in the loft area. A little information about this flooring. It’s 100% waterproof, scratch resistant, easy to clean and super durable. One of my insta-friends recently installed this flooring in her home. It’s perfect and easy to maintain, especially if you have pets or small children. We still have carpet in our upstairs bedrooms and media room. We are planning to install these floors on the stairs, in the near future.
Notice anything new?
What’s better than one coffee table? Two!
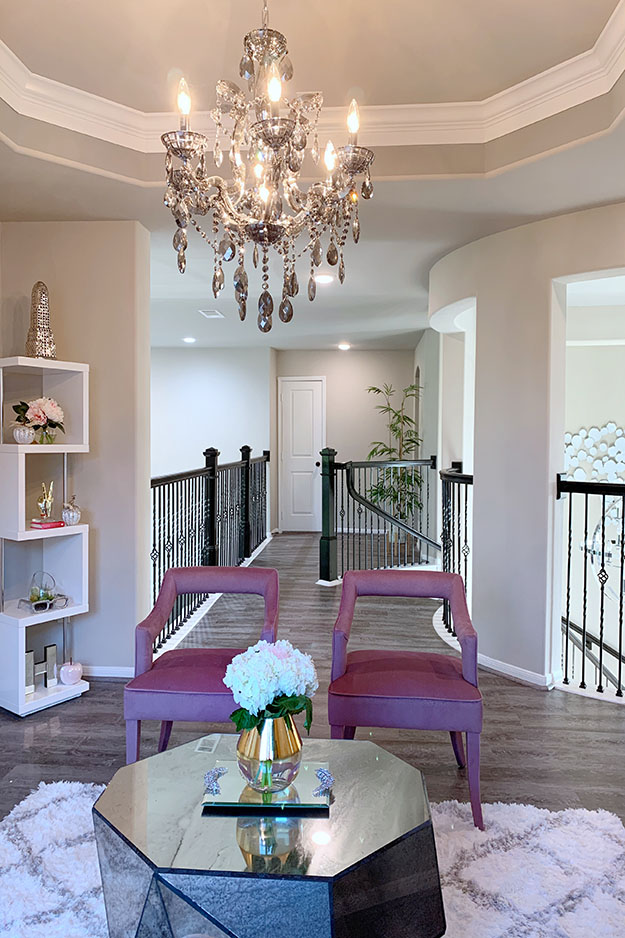
Next, I started picking out and ordering furniture, some of which took a little longer than expected to get delivered. Somehow I need up with two coffee tables for this space *covers face*. I love both of them and I switch them out every other week, haha! The one I’m not using at the moment stays in the media room. I first got the antique mirrored coffee table to go with my smoke glass chandelier, but then I saw this other beautiful marble coffee table and couldn’t walk out of the store without it. To be honest, I got the marble coffee table for 75% off #winning! Who doesn’t love a good deal?
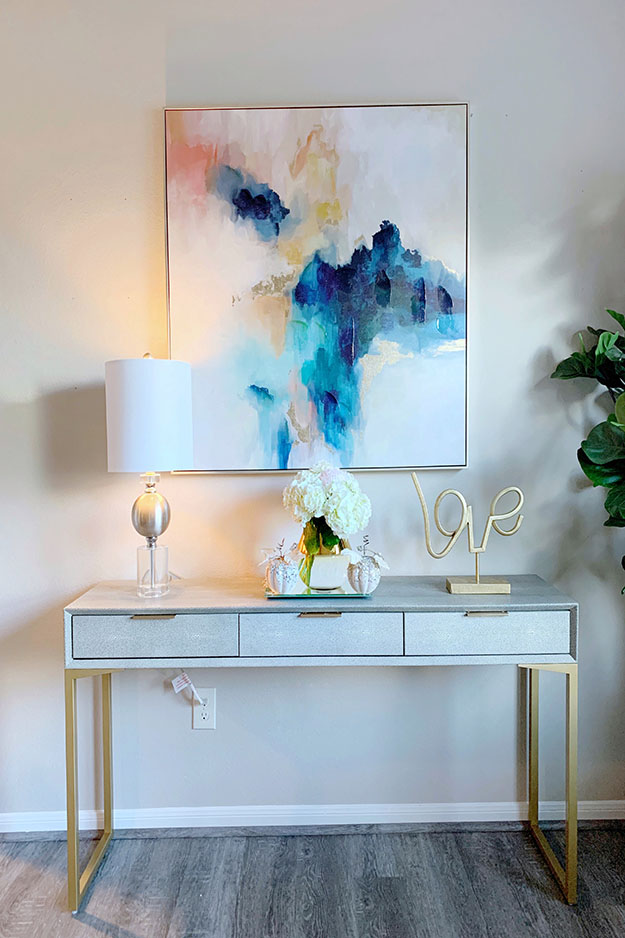
Everything here are my most recent gift/purchase. If you’ve been following me for the last 4 months, you would’ve known that I collaborated with TOV Furniture and Gallery Furniture. This gorgeous console is a TOV piece and I’m in love! It has a textured shagreen finish with brass legs. The artwork I picked up from Home Goods and it was about $69. The accessories I got from a few different stores.
By the window, I have one of my favorite pieces from TOV Furniture, the Eva sofa! I have gotten so many compliments about it. It’s modern, sexy and super comfortable. I still have a few more things I need to get done to complete my upstairs loft decor and design and I’ll keep you guys posted on process.
Please remember to check out my other blog posts here and subscribe to my blog for exclusive first looks. Thank you so much for taking time out of your day to read my blog! Feel free to drop a comment below and let me know what you think about this space 🙂
Hey guys! Sharing my modern fall entryway decor with you all today. This will be a nice and short blog post because, well, my entryway doesn’t have a lot going on. As always, I hope that you are inspired to decorate your home for fall, or just in general. Please make sure to check out my living room fall decor and my fall tablescape decor blog posts.
This post contains affiliate links. All opinions are my own. You can shop my home here.
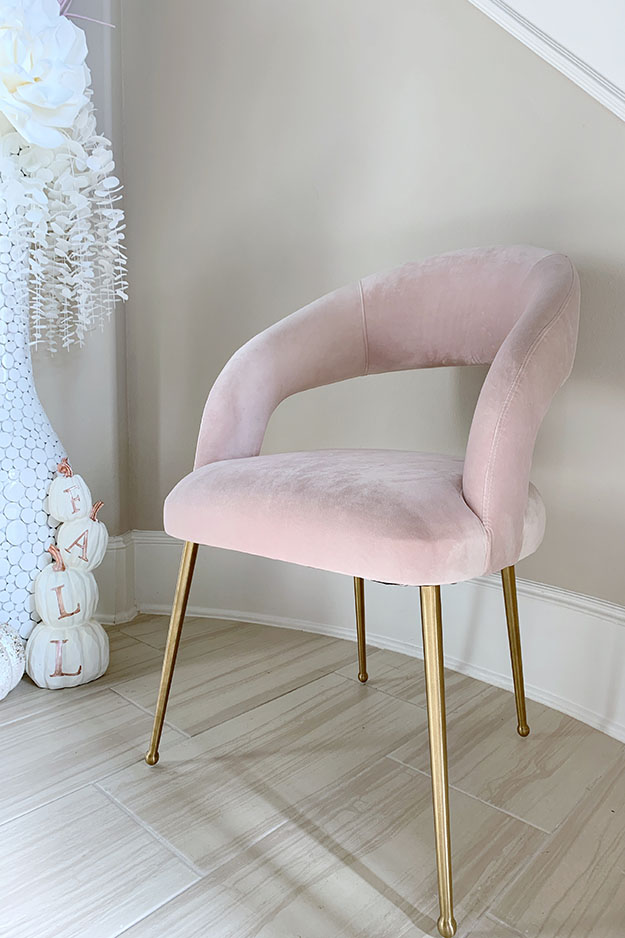
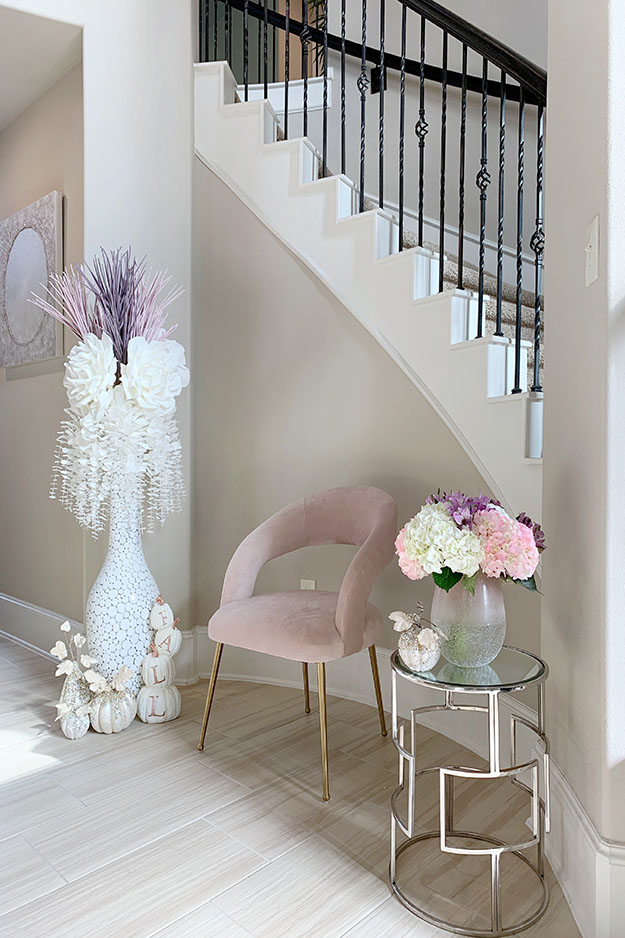
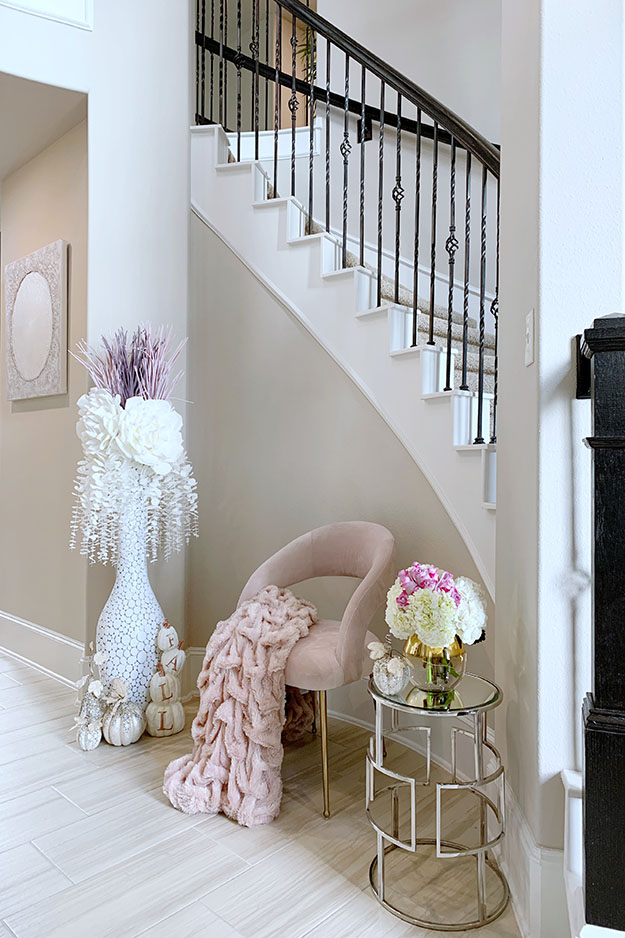
The biggest change in my entryway is this beautiful blush chair. I’ve always wanted to change out the chair I had before, but I couldn’t find any that I was in love with, until I saw this one. I used to be a compulsive shopper, but now I only buy items I absolutely love. Are you a compulsive shopper? The reason I stop being a compulsive shopper is because 70% of the time I’ll end up buying something that I’ll never use or something that I ended up hating after a few weeks. You can find the chair here.
Tip: It’s OK to take your time and buy items you truly love. Don’t rush to buy trendy things or things that you’ll enjoy for a few weeks. Save them coins!
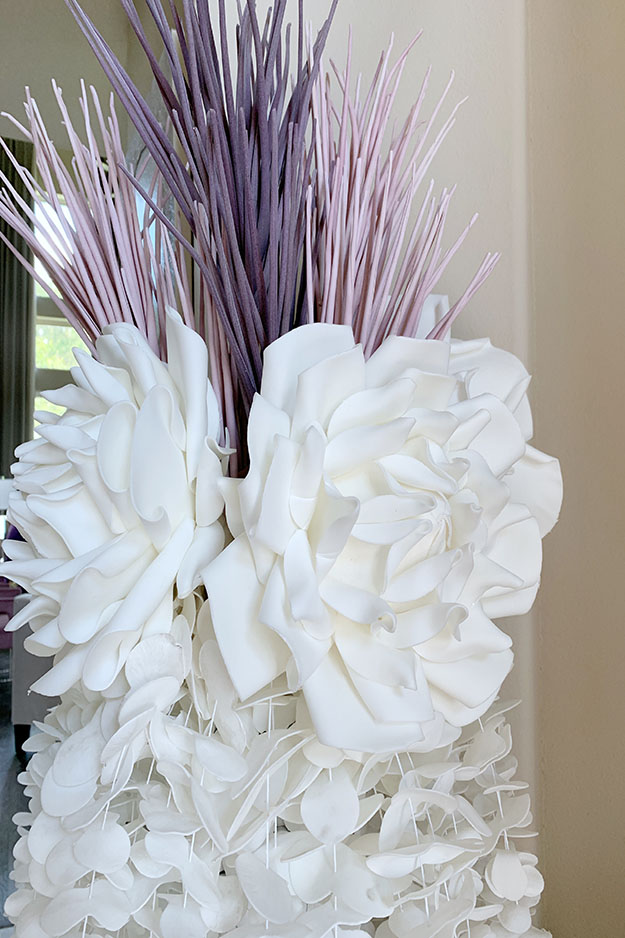
So, with the new blush chair and my fall colors already in mind, I picked up these blush and lavender stems to go with the white stems I already had. I played around styling them differently until I came up with one I’m ok with. I’m sure I’ll be changing it up for the season is over. Watch this video of me styling my entryway. For a video I almost didn’t post, it is my highest performing post ever!
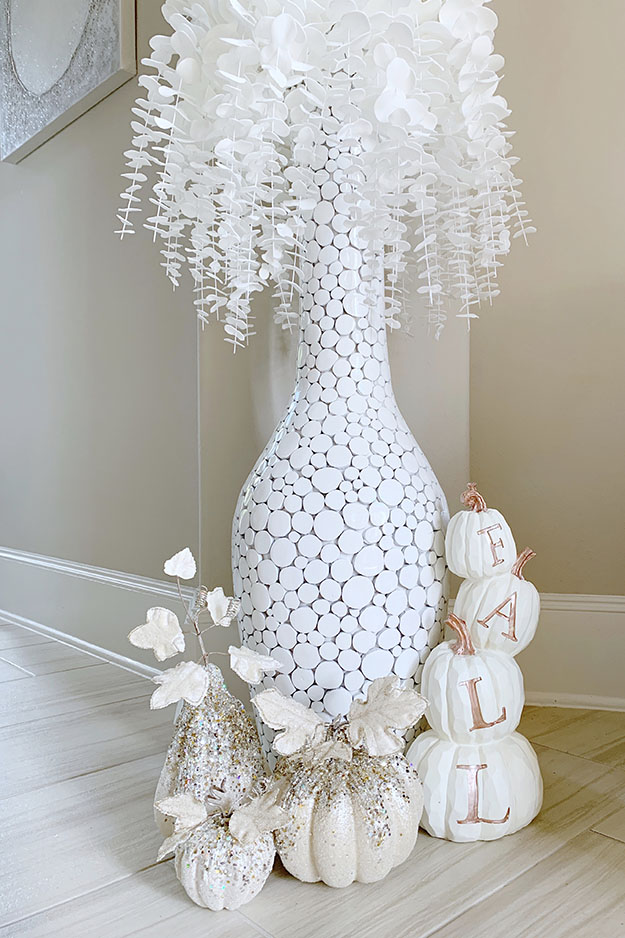
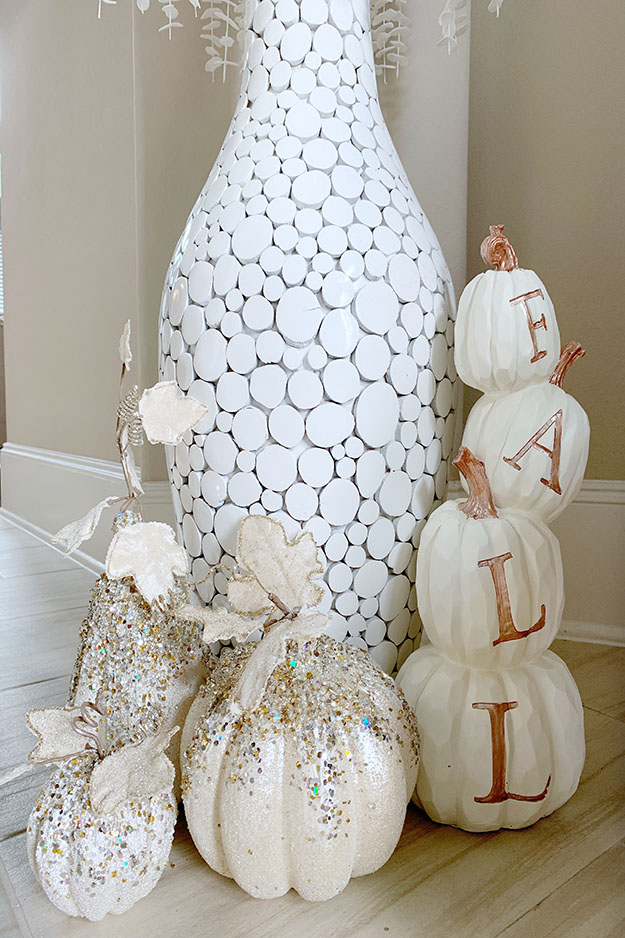
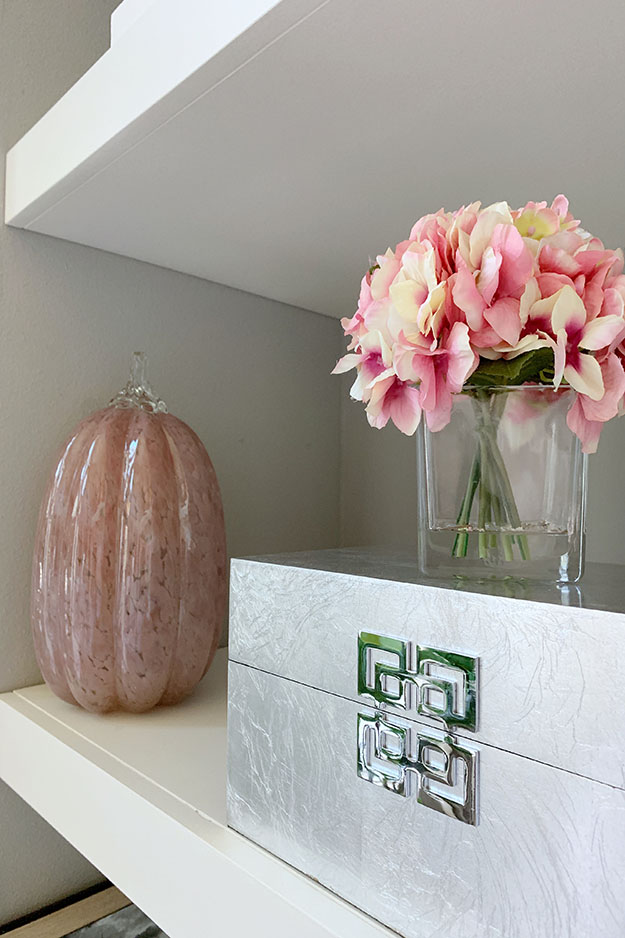
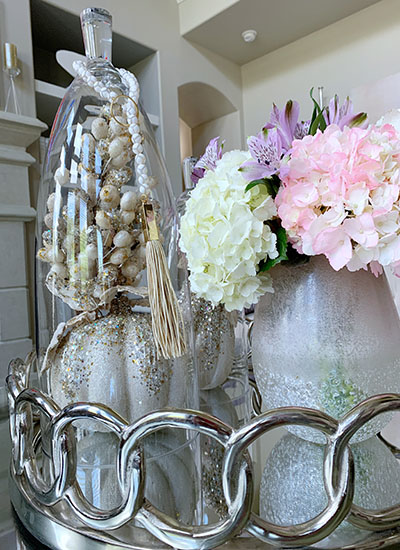
This vase is most people’s favorite, including mine. It’s modern with intricate details and have some sort of a natural element look. It’s definitely a statement piece! Whether you decorate it with floral stems or leave it empty, it will always stand out in a room. On the floor, I’ve added some beaded pumpkins and a “fall” pumpkin that I picked up from a local store last year.
Tip: Be creative when decorating! Don’t be plain and boring. Pull things from other rooms to get the look you want and make it your own. Also, sometimes less is more, so don’t overthink!
That’s it guys! This is my simple and modern fall entryway decor. Please feel free to leave a comment below and remember to subscribe to my blog!
Hey guys! Welcome back to my blog. I hope you have already checked out my living room fall decor. Today, I’m sharing with you a first look at my modern fall tablescape. Now, this might get changed up a few times before fall is over, but this is what I’m working with, for now. Hope you like it 🙂
This post contains affiliate links. All opinions are my own.You can visit the shop page to shop my home.
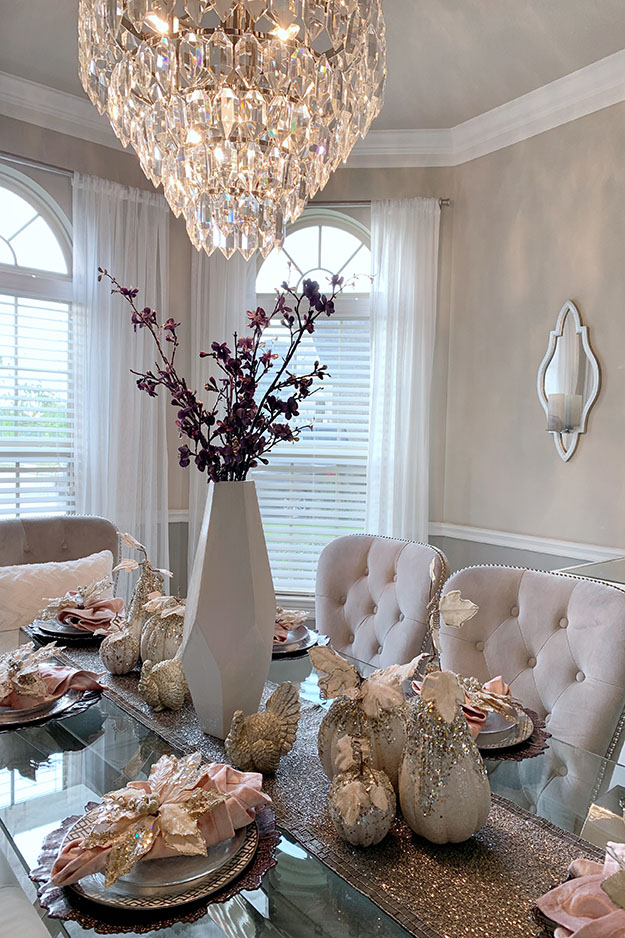
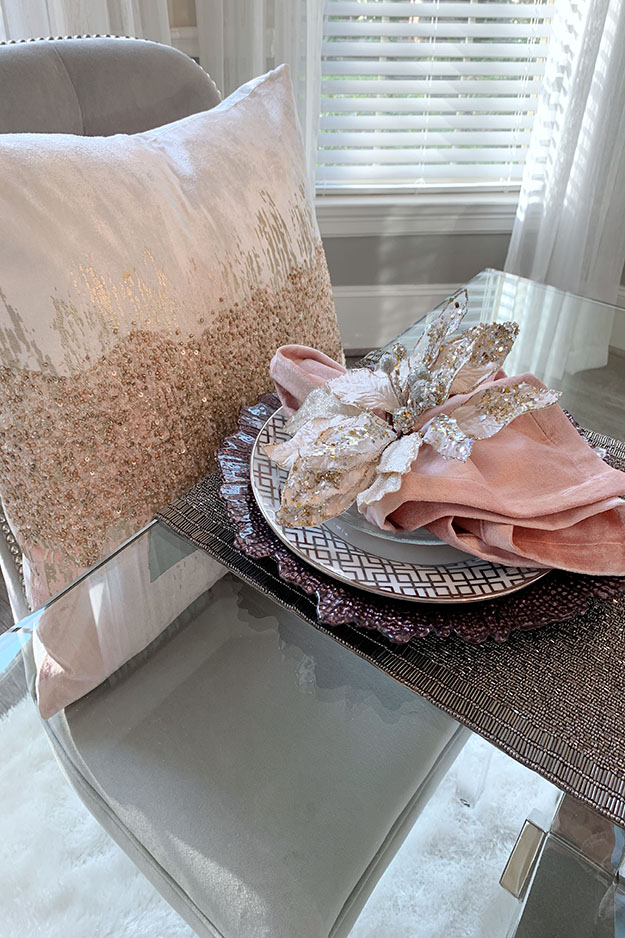
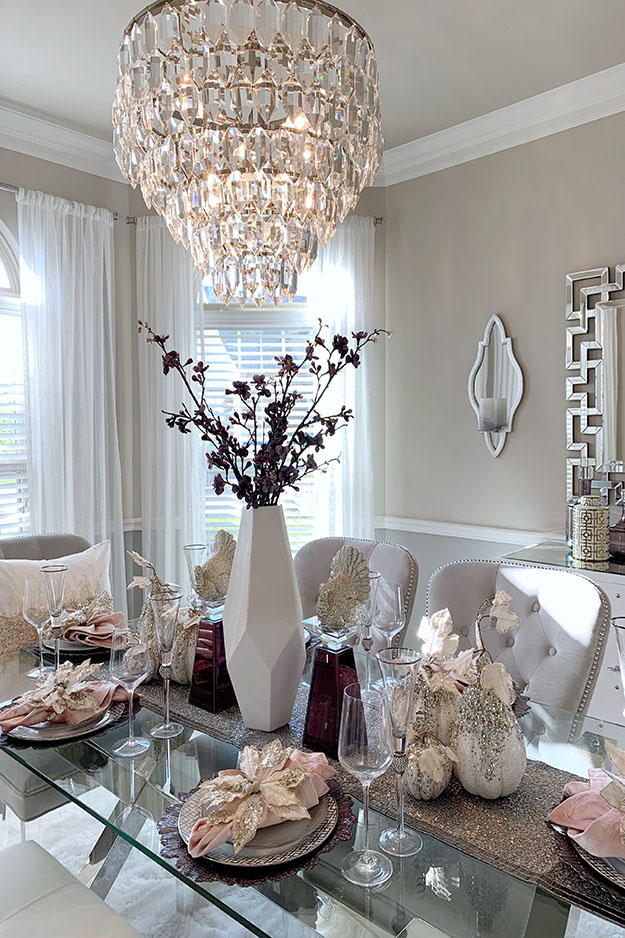
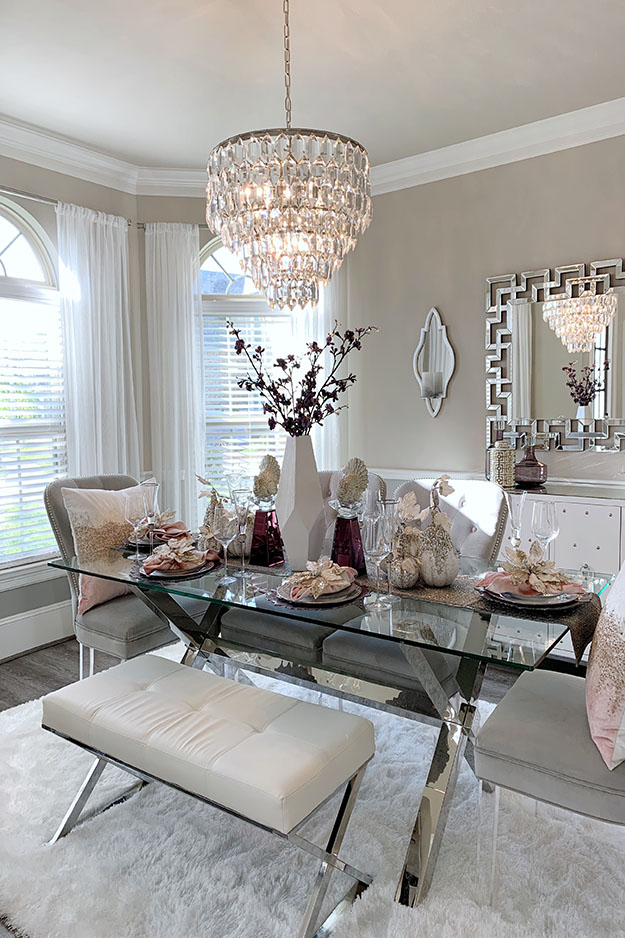
Can we say glam?! It wasn’t my intentions, but with all the glitter it’s safe to say this is my most glam tablescape, lol. I’ve had everything from last year, except for the napkins. Your girl always try to avoid unnecessary spending. Trust me, as an influencer, you can end up spending tons on decor to keep things fresh for and interesting for your audience. However, a few simple changes can make a huge difference! You just have to learn how to get creative and work with what you have. You can add a new item here and there, but no need to break the bank on seasonal decor.
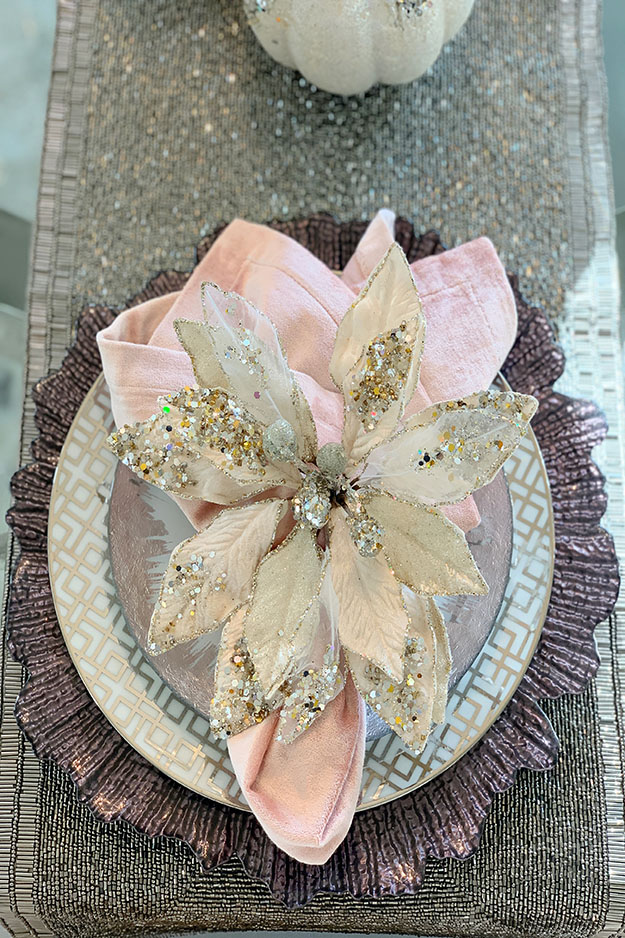
I wanted to continue the purple and blush theme in my dining room, so I bought these velvet napkins to go with my purple chargers. The napkins are super thick and soft. They give you that elegant and luxurious look. Paired them together with the poinsettia napkin rings, and voila! The You can find similar chargers here.
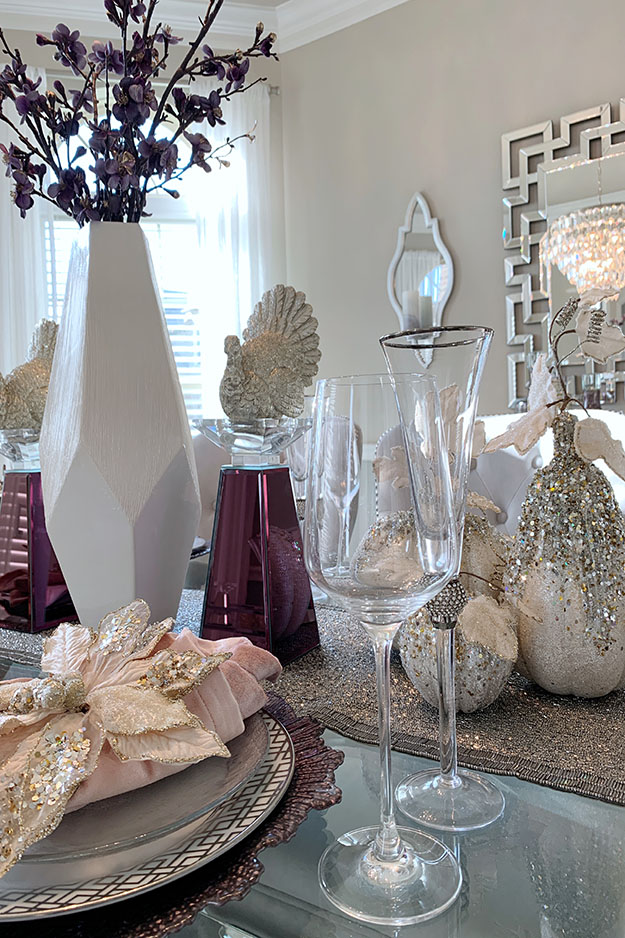
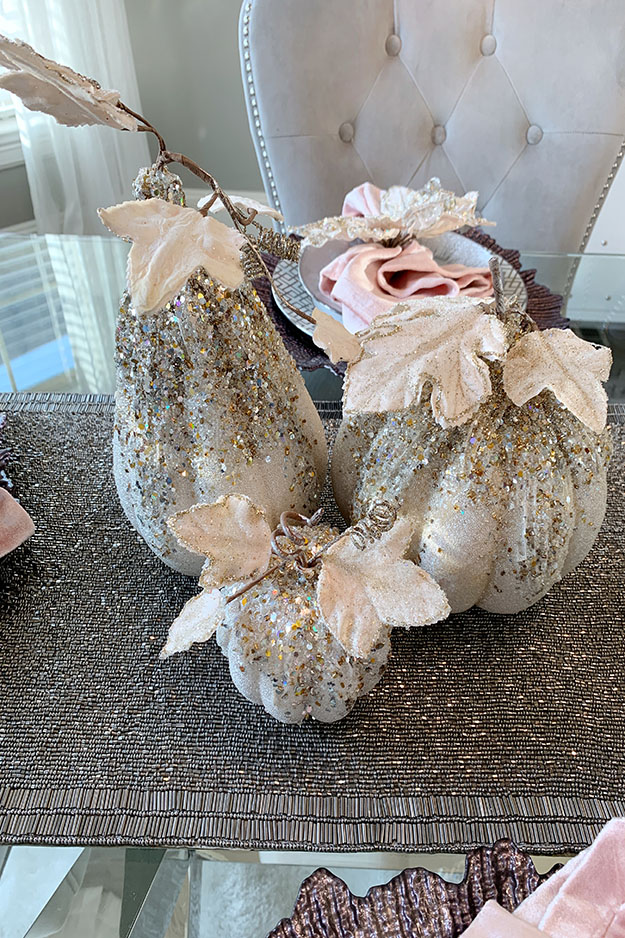
Let’s talk pumpkins & gourds! These are by far some of my favorite pumpkins and gourds and they will be showing up every fall in my house until all the glitter falls off, haha! Aren’t they gorgeous? The beaded table runner is also my favorite, as you can probably tell. I switch it out occasionally, but not for long. You can find the runner here.
Here’s a full view. Notice that I’ve added the two purple candle holders, and wine and champagne glasses? While I was taking these pictures, I was still trying to change things up. I still have a few more tweaks to do, but this is the look guys. This is my modern fall tablescape! Feel free to drop a comment below and let me know what you think, or if you have any questions.
Please check out my other blog posts and remember to subscribe! Thank you so much for stopping by. I appreciate you all!
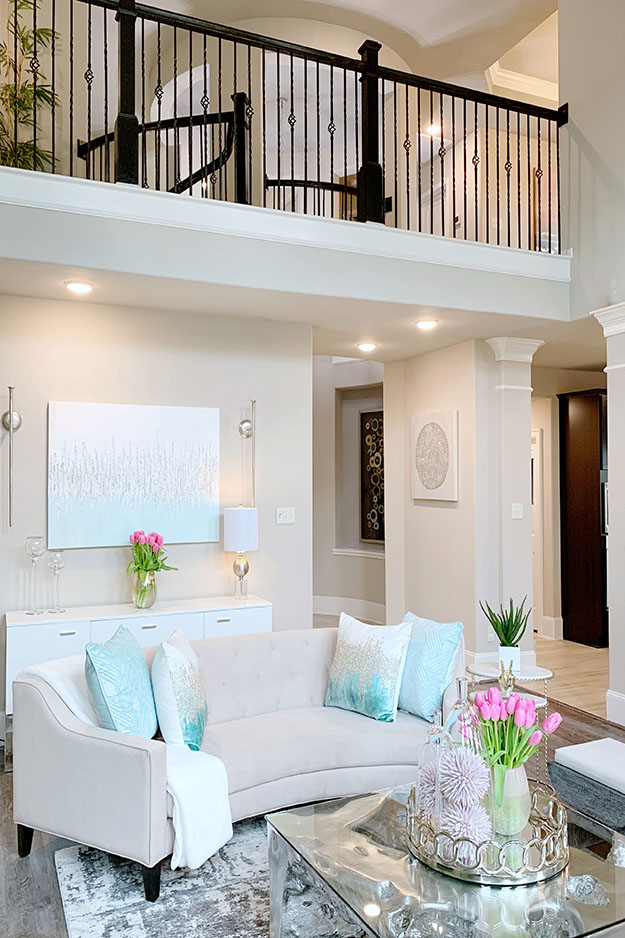
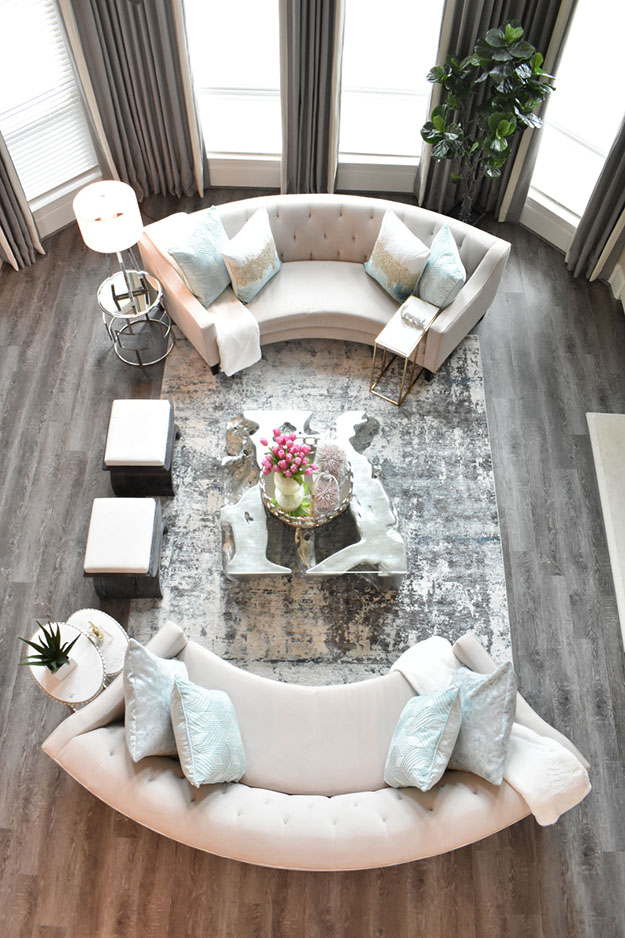
Hey Y’all! My last post showed you a sneak peek of only one side of my living room, but in this post, I’m showing it all! This will be a short blog post, but I hope you like it. I hope you’ll get motivated/inspired to finish up your fall decor, if you haven’t yet done so. Here is my Modern Fall Home Decor, starting off with my full living room reveal.
This post contains affiliate links. All opinions are my own. You can click here to shop my home.
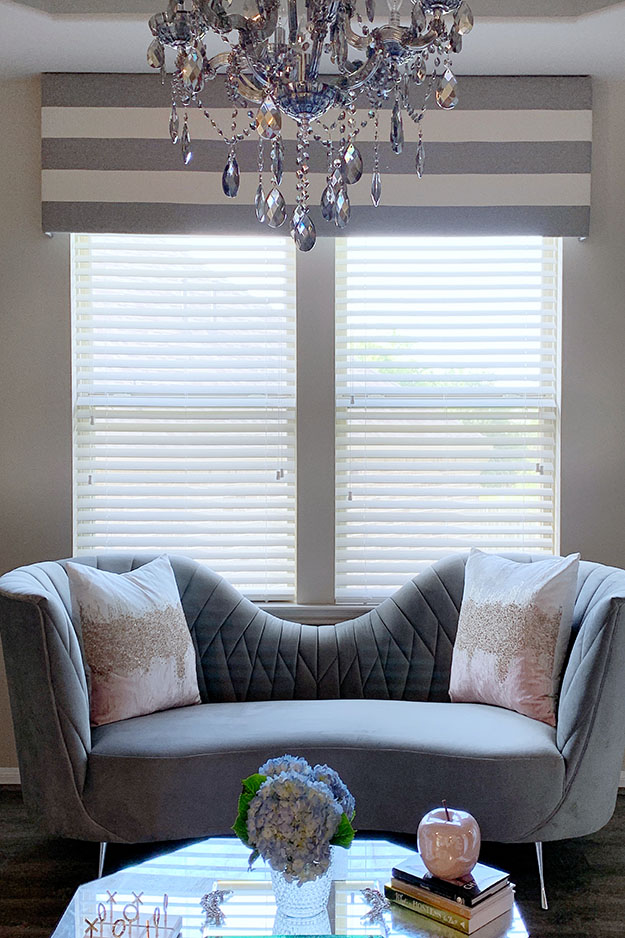
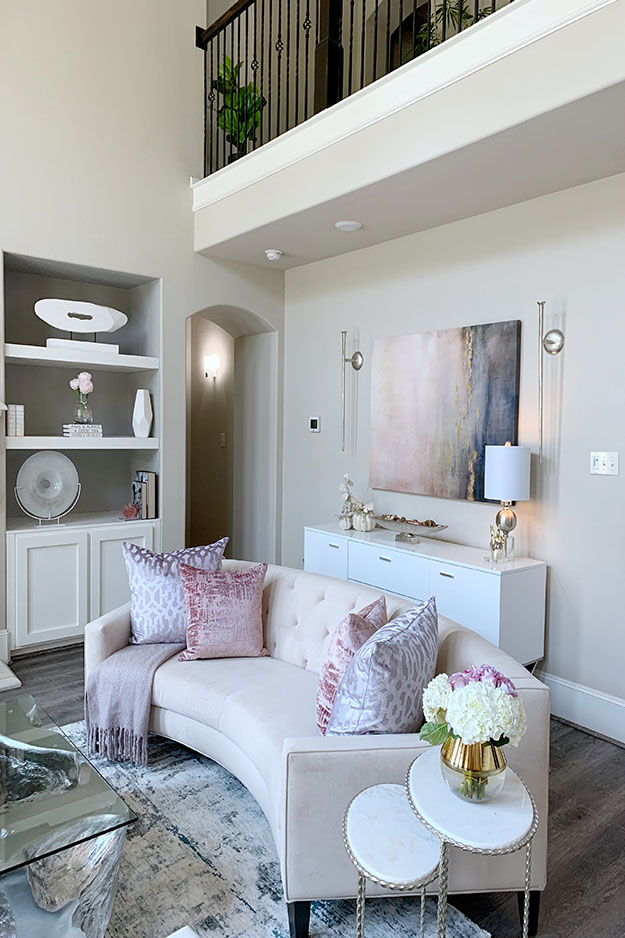
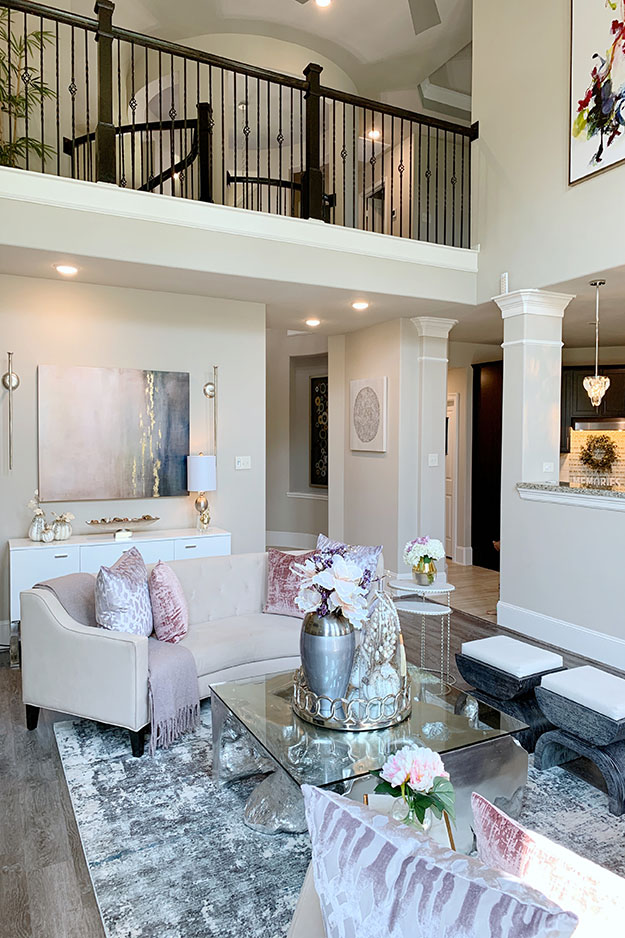
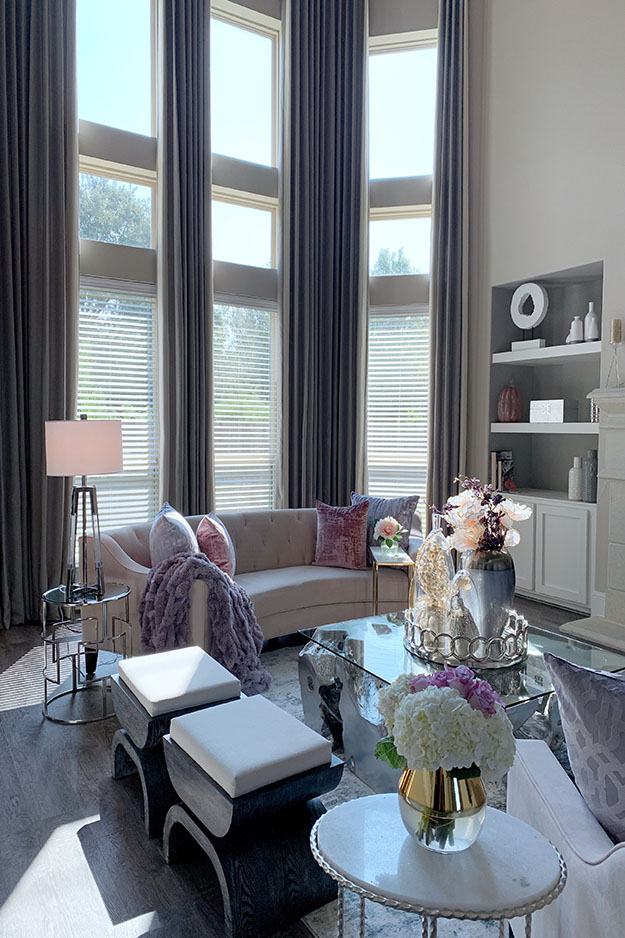
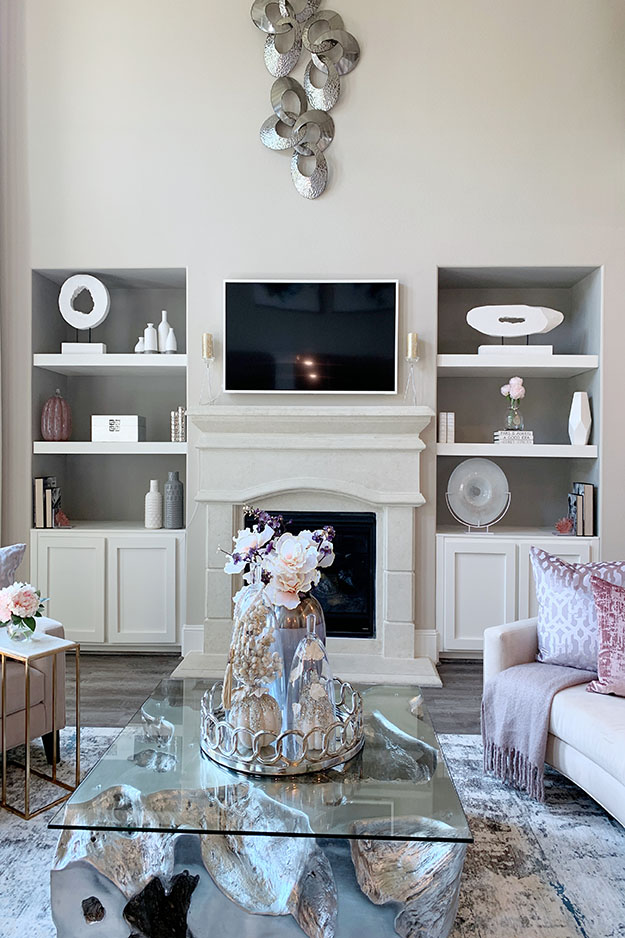
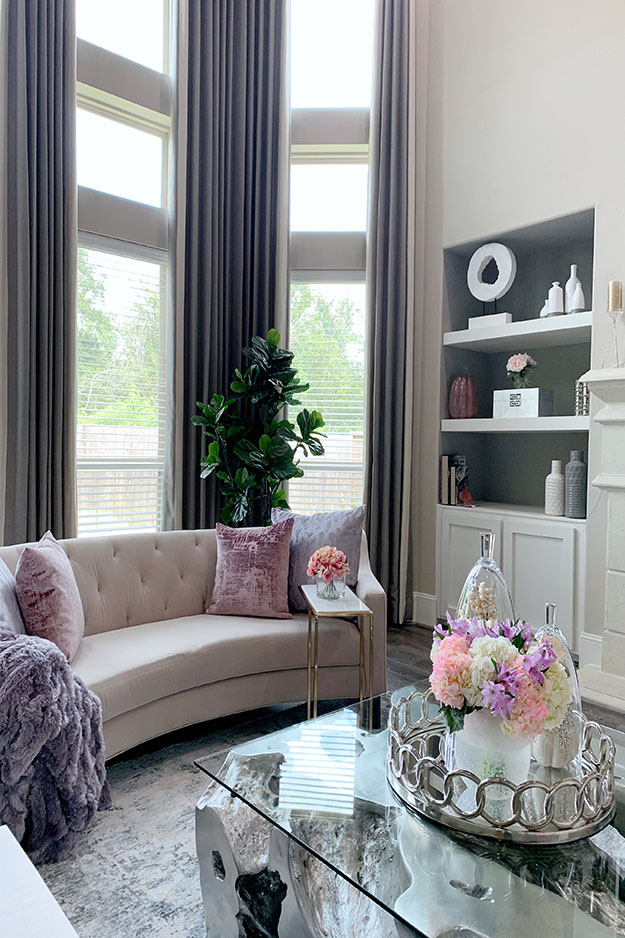
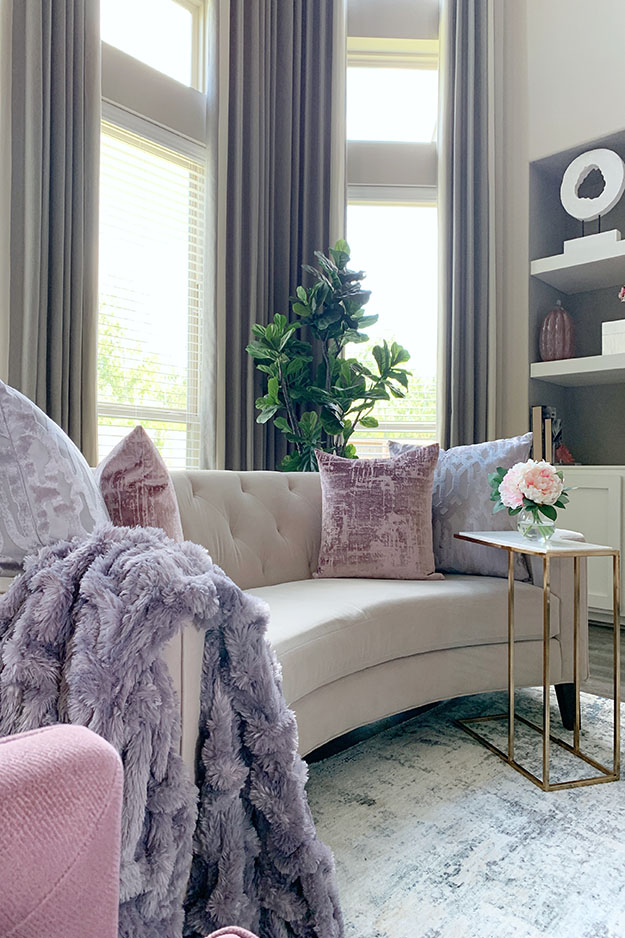
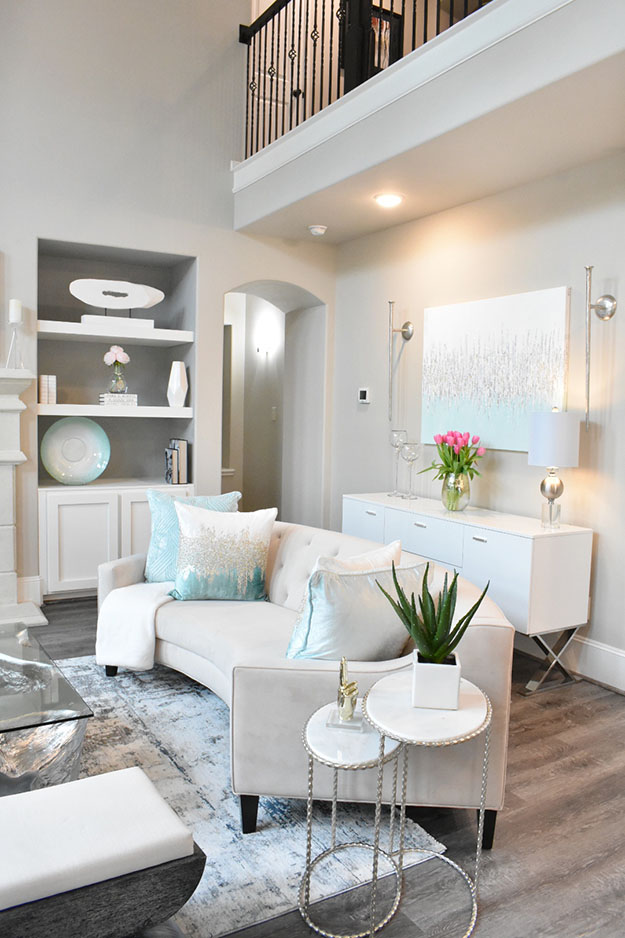
I received my two additional amethyst pillows to complete this sofa. The throw I’ve had since last year and nothing much was done to this side of the built-ins. My beautiful artwork has been sitting upstairs for the last couple months, and I thought this was the perfect time to bring it back to this space. Doesn’t it blends in perfectly with my decor? You can see hints of purple and the obvious blush. I normally hang my gold sconces on the sides of this artwork, but this time I decided to use the silver sconces instead . I love mixing metals.
I am completely in love with my rug! You can find it here. I have the 8×10!
This is one of my favorites views. You can see a glimpse of two huge artwork that I have above the wall the separates the kitchen from the living room. They are two of my favorite art pieces, but it’s so hard to photograph them since they are hanging so high. The hubby wants to knock that wall down and make it one big open space. That would be nice, but all I’m seeing is $$$ and lots of dust, lol. I’m planning on getting a nice chandelier in here…maybe for Christmas or early next year.
Another reason why I keep my coffee table decor simple is because looking at it from this angle, it will look cluttered with the two fully decorated built-ins behind it. Again, I hate a cluttered look. Less is more, for me.
This concludes my modern fall home decor – living room edition. Hope you like my mixture of colors and decor choices. Please feel free to drop a comment below if you have any questions. Make sure to check out my other blog posts and subscribe to my blog!
Hey guys! So, I wanted to give you a little sneak peek of my fall living room decor, even though it’s not all the way completed. I am still waiting on two pillows and a few more items, and I’m hoping to get them before fall is over, lol. Hopefully, you’ll get some inspiration to start decorating your home for fall, if you haven’t already done so. Enjoy!
This post contains affiliate links. All opinions are my own.
This year, I wanted to mix amethyst (purple) with blush. My inspiration for my fall living room decor came from these faux blush/mauve/purple hydrangea flower stems I bought a few weeks ago. They were the perfect color combination. I’m not the one to go the traditional route when decorating for fall, as I like to keep things interesting by playing around with different pops of color. Let’s get into some details!
This faux hydrangea was my inspiration.
Pillows
If you’ve been following me for over a year, you’ll notice that I’m using the same amethyst pillows from last fall. I always shop my home before running to the store to buy new items, and I encourage you to do the same! Also, I am reusing some items from last fall. I haven’t found the money tree yet, so I’ll be re-using decor pieces until then, lol. Okay, I know I have other blush pillows, but I felt like they were too glam! I wanted a more subtle look/style and the new blush pillows are just perfect. Not only are they perfect in size, they’re velvet and have this luxurious look and feel. They are not too “blushy” like the other ones I have and they were reasonable. You can find them here. I added an amethyst throw for that cozy vibe.
Look how beautifully the amethyst and blush pillows blend together.
Coffee Table
I like to keep my coffee table simple. I mean, the table itself is a work of art and I like to show as much of the beautiful details as possible. This is why, for the most part, you’ve only seen it with a tray, decorated with fresh flowers and my jules cloches. Take a look at how I’ve decorated the coffee table in my Spring/Summer Living Room Design and then take a look at this one. For fall, I’ve decorated the cloches with grape clusters, pumpkins and gourd. Since I live for fresh flowers, I put together a simple arrangement to go with my theme. By the way, fresh flowers make me smile 🙂
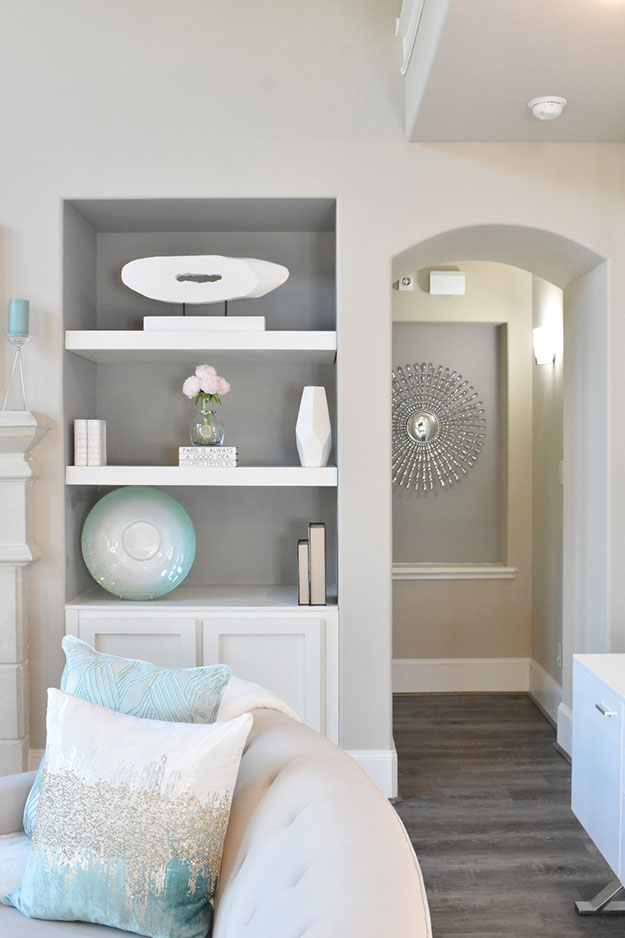
Built-ins
I am not a huge fan of decorating shelves, so not a lot of changes took place here. I’ve added a pumpkin and that’s about it. I might add another pumpkin or two, but don’t hold me to that 😉
What do you spy?
Thank you so much for stopping by to see this sneak peek of my fall living room decor. Full room pictures coming soon. Please feel free to drop a comment below. Check out my other blog posts and subscribe to my blog!
This is Part 1 on How To Grow Your Instagram Account Organically!
Did you know that I started my Instagram page 17 months ago? One year ago I had 10K insta friends, and today I have 109K. That’s almost 100K in one year! I’m not the one to throw my numbers out there, but I get asked every day for tips on how to grow your Instagram account organically. While I don’t know every single tip, I do know enough to share a few with you. I’m sharing tips that worked for me and, hopefully, they will work for you too!
This post contains affiliate links. All opinions are my own.
What are you passionate about?
The first thing you need to do is figure out what your passion is! Do you spend most of your day thinking about this passion? Do you see yourself doing this for a long time? Do you spend a lot of you time researching trends? Do you follow Instagram accounts that shares the same passion as you do? These are just a few questions to ask yourself before thinking about starting a business page. The last thing you want to do is jump into something you’re not passionate about. I’ve seen so many people come and go because it’s so easy for their audience to see that they’re are not passionate or genuine about what they’re doing. Once your audience figures that out, your engagement will start to go down and some will even click that unfollow button. So, it’s very important to figure out what you’re passionate about and stick to it.
Open a Business Page
So you know what you are passionate about and now it’s time to start a business page on Instagram! The hardest part is overcoming your fears of thinking you don’t have what it takes to open up your own Instagram page. The passion and drive that you have is enough, trust me! Once you start and become consistent with your content, everything will fall into place. One of the main reasons for using a business page versus a personal page is that you get access to your insights. More to come on insights. Make sure your profile has a picture, your name, your business category, your email address, website address, and a short description of what your page is about.
Design Aesthetic
I am talking about your Instagram feed design aesthetic. Starting out, you want to be consistent with the type of pictures you post. If you open a Home Decor page, your audience is going to expect to see home decor content. If you open a Life Style page, then your audience will expect to see a little bit of everything. Do not confuse your audience! So many people have made this mistake and it’s sad to see their engagement decline as a result :(. Please note, as your audience gets bigger, you’ll have much more flexibility to post pictures outside your norm. Assuming that you might not get collaborations until you hit 1K or so, all your pictures should be closely edited the same to give your feed that uniformed look. Find an editing app that works for you and stick to the same editing styles.
Pictures
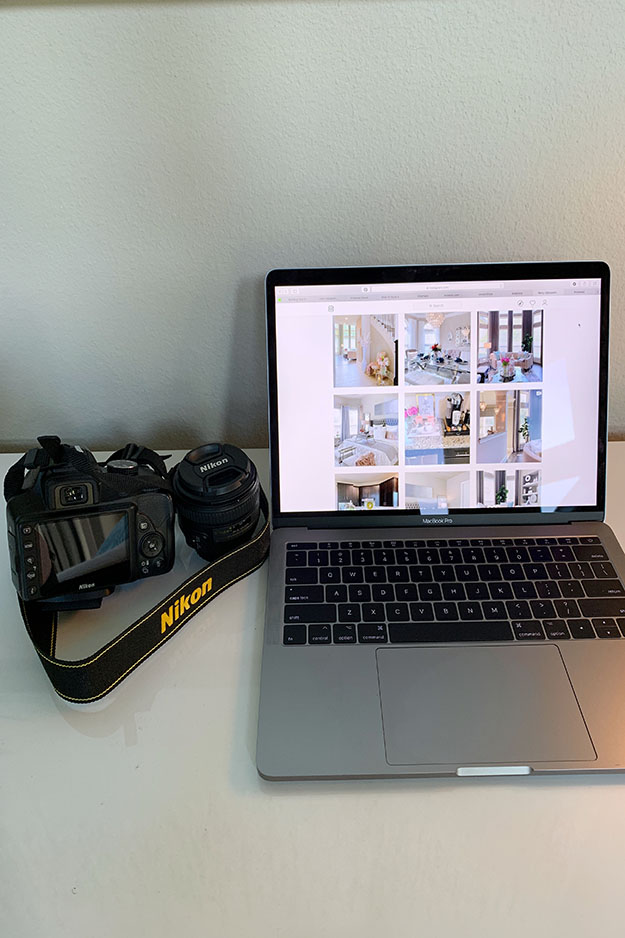
OK, here’s one thing you can’t slack off on. Quality pictures are EVERYTHING on Instagram! Have you ever seen a post of someone wearing a cute outfit or post of a cute powder room, but the picture is blurry and/or dark? You don’t want to be that person! You can take great pictures with your iPhone. I actually find it easier to take pictures with my iPhone than with my professional camera. Take a look at the pictures in my Spring/Summer Living Room Design post. All of the pictures were taken with my iPhone XS Max. Starting out, I used my old Nikon P600, but eventually upgraded to a Nikon D3400 because I knew I needed to start taking better pictures. By the way, I didn’t know anything about angles and editing and this is something I learned over time. Lighting is key to taking quality pictures. Try to shoot in natural light as much as possible. If you are having trouble with proper lighting in your home, you should invest in a Ring Light. It’s amazing! Your pictures will get more engagement and features if they are bright and crisp versus dark and blurry. You should post a picture everyday, especially when you are first starting out. You can even post twice if you have lots of content.
I hope you find these tips on how to grow your Instagram account organically helpful! Make sure to have fun doing this and don’t lose yourself during the process. It’s easy to compare yourself to others, but just focus on being your authentic self. Numbers aren’t everything, but it surely helps when brands are looking to work with you. On part 2, I’ll be talking about ENGAGEMENT, Insights and Hashtags! Make sure to SUBSCRIBE to my blog!
Hey guys! I’d like to share 3 simple table setting ideas with you. I say simple because they don’t include silverware and only one setting includes stemware. These are not formal table settings that you’d see at a 5 star restaurant or at a wedding, lol. These are ideas/looks I created at casa de Pops Of Color Home.
This post contains affiliate links. All opinions are my own. All of my table decor are from Z Gallerie, and you can use my discount code KERRY20 to get 20% off your purchase. You can find my rug here.
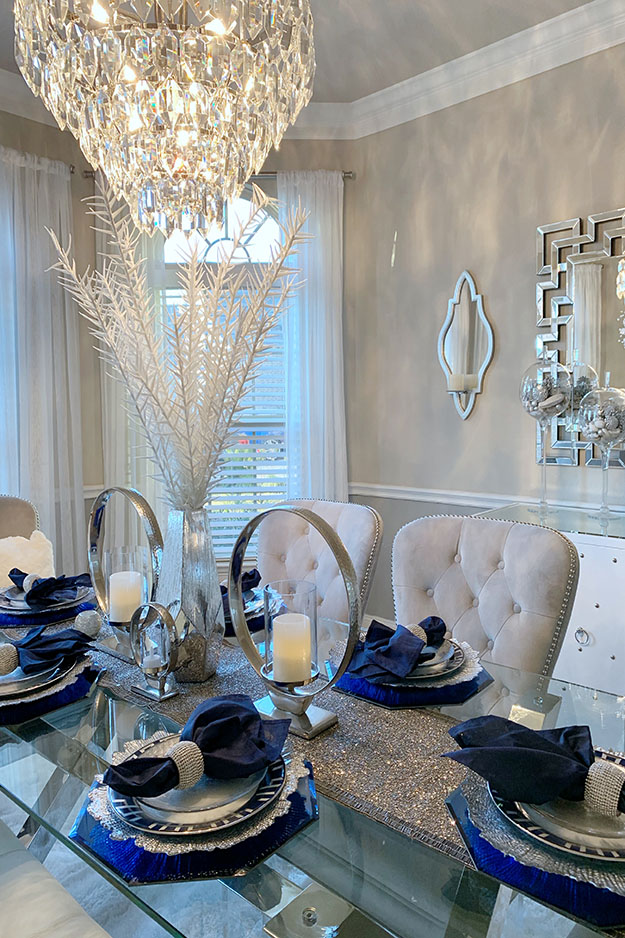
This first table setting idea which includes a royal blue theme is very classic, timeless, and elegant. It can be used throughout the whole year! I started out the year with this theme and I was completely in love. Those octagon placemats were my inspiration. The moment I saw them I knew they had to be in my home, and they did. To achieve different looks for each season, add some fresh or faux flowers for spring and summer, some pumpkins and grape clusters for fall, and all the glitz and glam for Christmas!
Design Tip – Owning a set of neutral dinnerware is key! Especially if you change up your table setting as much as I do. Remember my very first blog post about one key bedroom design tip? If you haven’t read it, you should go check it out here. By neutral dinnerware, I’m talking about a plain set of white, silver, or gold. Or, a set of white mixed with silver or white mixed with gold, depending on your metal preference. I own a neutral set of plain white and a set of white mixed with silver and I pair with them other colors to switch things up. In the picture above, I’m using a silver charger, white and silver salad plates with blue and white dinner plates.
The second of 3 simple table setting ideas give you that Spring and Summer vibes. This beautiful Tiffany blue will bring fresh, light, and airy feel to any dining room. It’s simple and elegant. Add some blush peonies or blush roses for a girls-night-in or for a romantic dinner with your special someone. This was my second table setting for 2019, and I used this theme for all of Spring and most of Summer. It was a favorite for my Insta friends 🙂
Design Tip: Adding candles to your table setting will bring that warm and intimate feel. You can mix large and small candles to get the best results. I love these Cirque Pillar Holder, (notice they’re in the first two table settings) and I often times mix them with small votives.
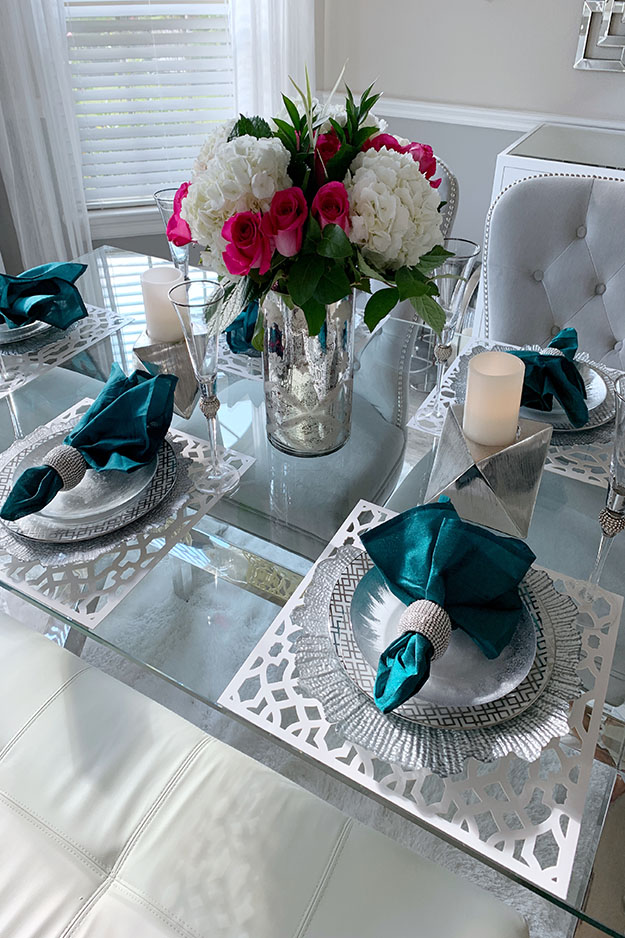
This 3rd and final table setting idea gives a more sophisticated feel with the fresh flowers and champagne flutes. Yes, It was my 3rd table setting this year and I think it is my favorite. Maybe because fresh flowers are included or maybe it’s that green that I love so much? Tell me which table setting you like the most in the comment section below. This is another color that I think is classic and can be used for all 4 seasons. I personally wouldn’t use it for fall, but that’s just me. If you like it for fall, use it! Notice how I’m using the chargers from the 1st table setting, and salad and dinner plates from the 2nd table setting? I’m also using the placemats from the 2nd setting.
Design Tip: Buy a few different color napkins. Take another look at my 3rd table setting and you’ll notice that everything is neutral except for the napkins (and flowers, of course). I could change up this look in 1 minute by switching out the green napkins to the royal blue napkins from the 1st table setting or to the Tiffany blue napkins from the 2nd table setting. Now do you see why I said that owning a set of neutral dinnerware is key?
Thank you so much for reading and I hope you find these 3 Simple Table Setting Ideas helpful. Fall table setting coming up next, so stay tuned!
Please subscribe to my blog and check out my other blog posts here.
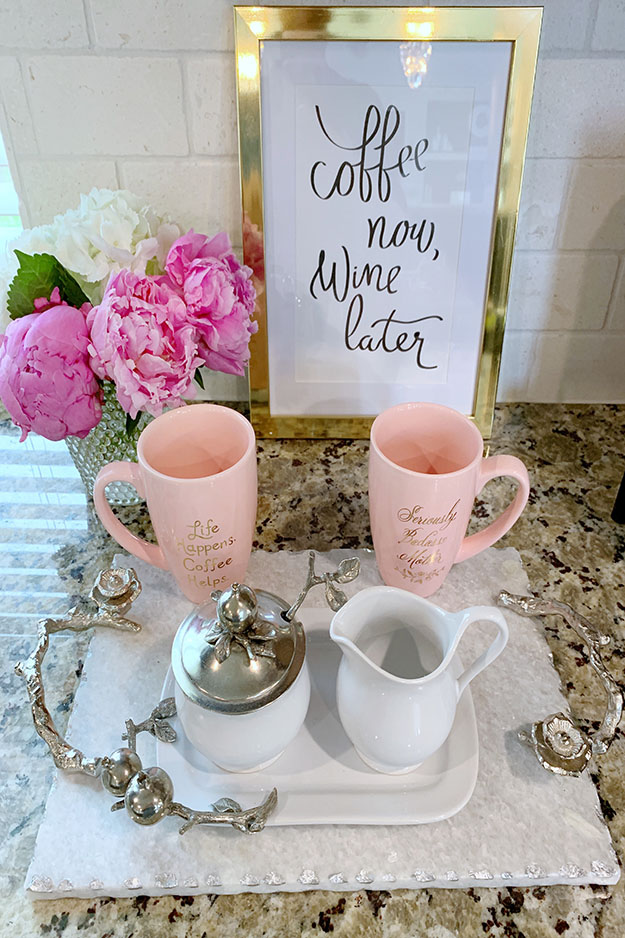
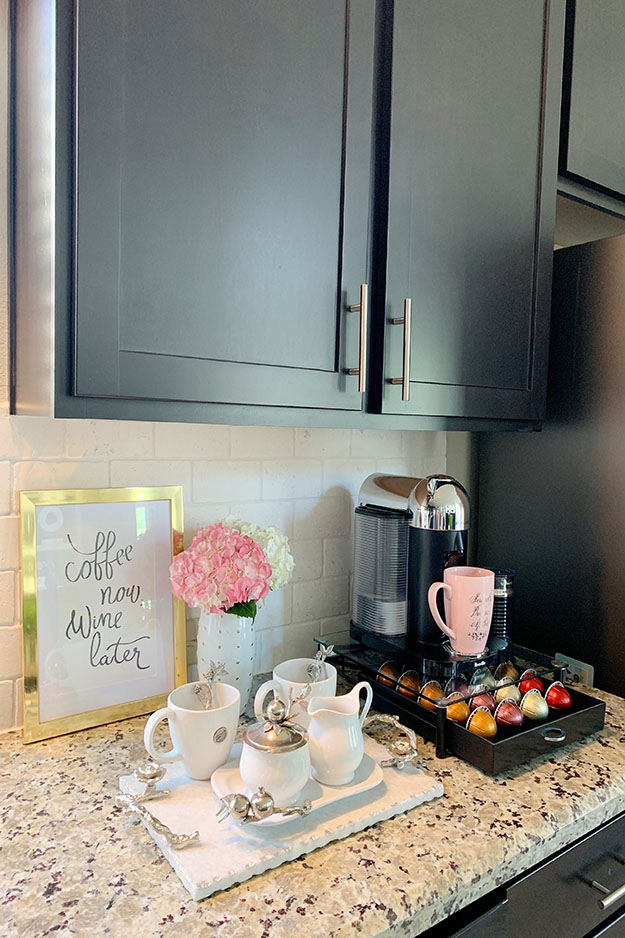
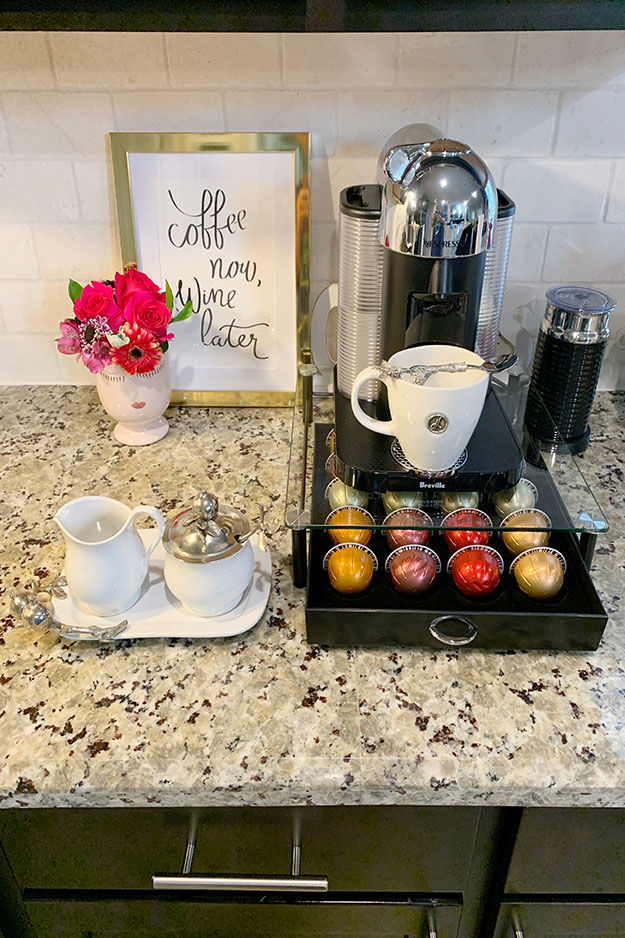
Hey guys! I wanted to share how to create a coffee/tea station in your kitchen. I know that some homes have a designated coffee/tea area, but some homes do not. I don’t have a designated space in my kitchen for this, so I created one.
This post contains affiliate links. All opinions are my own.
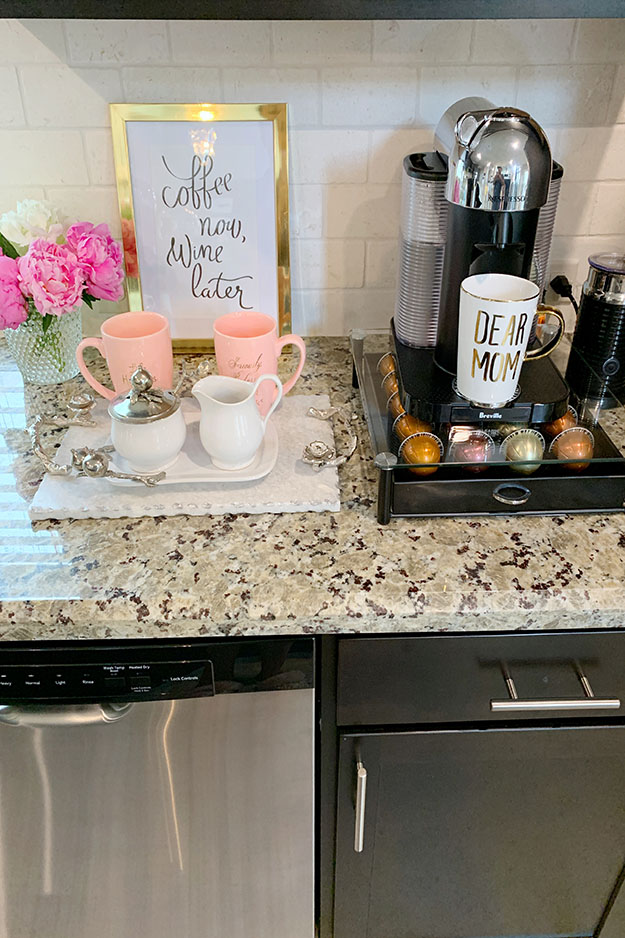
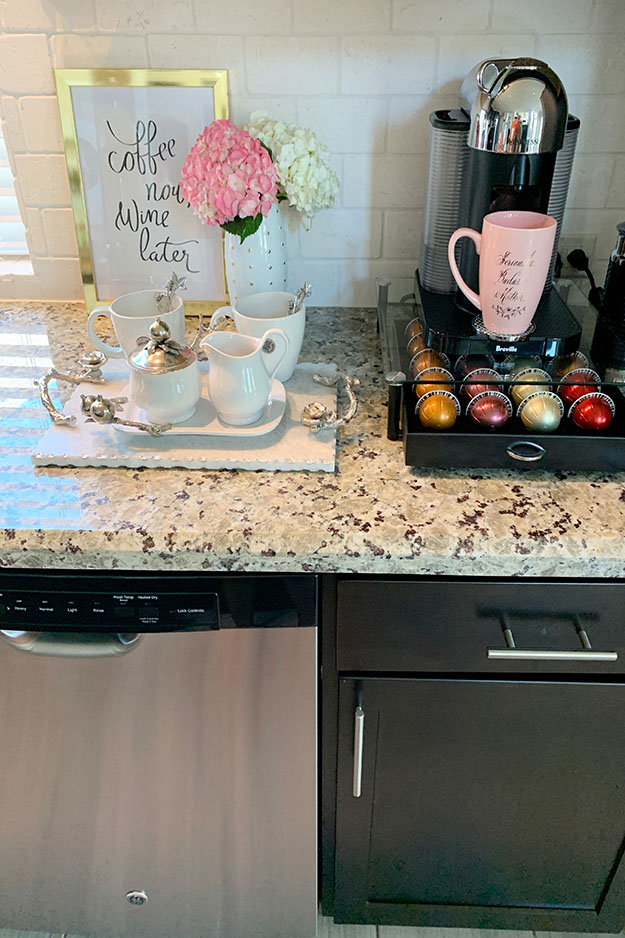
Since I was going to use up a portion of my counter space, I picked the spot we use the least. The spot that I chose is between my sink and my refrigerator. It’s a relatively small area, which is great because I didn’t want to take away too much counter space from the cook aka the hubby, lol.
The Coffee Machine
Since we are not tea drinkers, we created a coffee station. A coffee machine is the first item we sought out. We had a Keurig before, but it was big and bulky and hard to clean. This time around, we wanted a smaller machine but the coffee had to be great, of course. After researching a few brands, we (the hubby helps with major decisions) decided on the Nespresso Vertuo espresso and coffee machine. I have absolutely nothing negative to say about this machine. The coffee is so amazing, you’d think it’s store made. I’ve gotten so many questions about this machine, it’s crazy, but in a good way. There are so many different flavors to choose from and the bundle comes with an aeroccino milk frother!
The Accessories
I wanted a coffee station with pieces that I haven’t seen too many people, if anyone with. It’s really hard for you to be the only one with specific pieces of decor unless you get it custom made. I started with the coffee and creamer set, monograms mugs and spoons. Next, I bought some blush mugs to add a little color, then I got the “Coffee Now, Wine Later” sign from a local store. I already had the marble tray with silver handles and the coffee pods drawer I bought on amazon. And, of course, I have to add fresh flowers because they put a smile on my face and they add that touch of elegance to any space.
Create one for yourself
Now that I’ve told you my steps on how to create a coffee/tea station, you can start thinking about creating one for yourself. See below guide.
Find a small counter space. A space that you don’t use everyday or a space that you can give up for this station
Pick out a coffee machine. Go with a small machine, especially if you have a small space. I know some people prefer using instant coffee, where they boil water on their stovetop and pour it in a cup with coffee, so this step is for people who uses a coffee machine. If you are creating a tea station, skip this step 🙂
Pick out accessories. You don’t want to go overboard on accessories because you don’t want the space to look cluttered. Pick out a few cups, a tray, and a coffee pod holder, etc. You can also store coffee pods in a drawer, if you have an unused one. Get a coffee station sign that you love and to finish it off, you can add fresh or faux flowers.
Bonus tip! Add something unique to make it your own. Always add your personal touch to any space you’re decorating, even if it’s a personalized cup in this case.
I hope found these tip on ‘How To Create A Coffee/Tea Statio’ helpful. Make sure to check out my other blog post and subscribe to my blog.
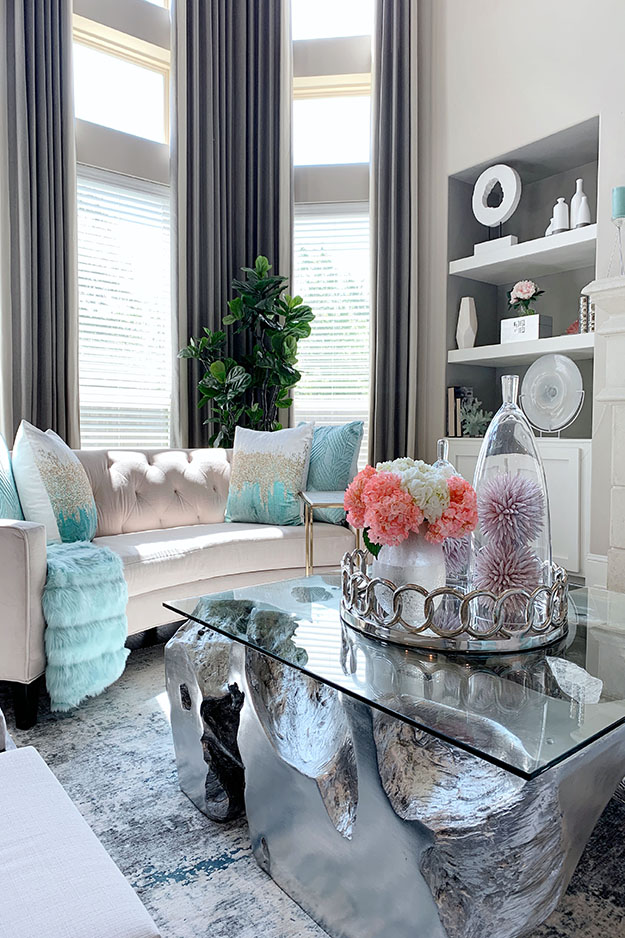
One of my goals for this blog is to make all of my Home Decor stylings easily accessible for my community. Instead of scrolling through my Instagram feed to see how I decorated a space for each season, I will put together a few blog posts for easy reference. Starting off with my 2019 Spring/Summer Living Room Design, I am going share the reason why I chose this color scheme and how simple it is to refresh your living/family room.
This post contains affiliate links. All opinions are my own.
Why I chose the color:
I see it, I like it, I want it, I got it *Ariana Grande voice*. And, that’s the reason I chose this color, lol. I know some people would never use this color palette in their homes and that’s fine. We like what we like, right? I am ‘Pops Of Color Home’, so using colors in my designs is inevitable. Now, there are some colors that I haven’t tried, like orange, red, and yellow, but I’m not opposed to using them. I do have some orange placemats that I might use to decorate for Halloween. Back to this Tiffany blue color. I’ve seen so many people with this look in their Spring/Summer Living Room Design, and even in their bedroom designs. Also, so many people have reached out to me to let me know that I inspired them and I’m always so humbled to hear that. Never have I thought that people would like what I do. I want to continue to inspire you to try different things and just have fun decorating your home!
A few simple and affordable ways to refresh your living/family room:
Change out the pillows. If you don’t want to buy new pillows, you can buy pillow covers from so many places online. You can find some here or here.
Change out the throw blankets. So many stores like Home Goods, At Home Stores, and Z Gallerie have plenty of options to choose from. See some options here.
Change up your coffee table styling. Switching out a few pieces can make a huge difference. Always shop your home before you go out and buy new items.
Add fresh flowers. You’ll be surprised to know how much of a change you can give a space by simply adding fresh flowers. If you’re not into fresh flowers, faux flowers will work just as well. I used both!
If you have built-in shelves or any other shelves, move around the decor or switch some of them out. Again, shop your home before buying new stuff.
This is our second Spring/Summer in our home and I feel like my living room is finally complete. We started from scratch with all of our decor pieces, so of course it took us some time to get everything together. Can’t say the same about other rooms that I have yet to share with you guys :). As always, thank you for taking the time out to read my blog. I hope you love my Spring/Summer Living Room Design as much as I do.
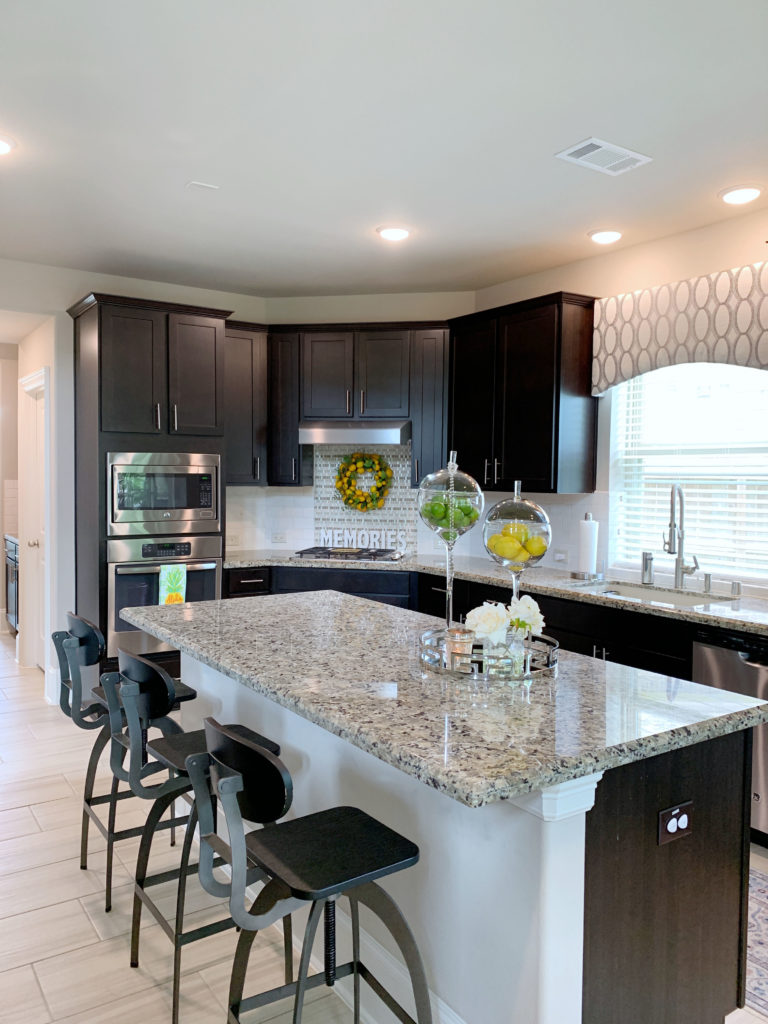
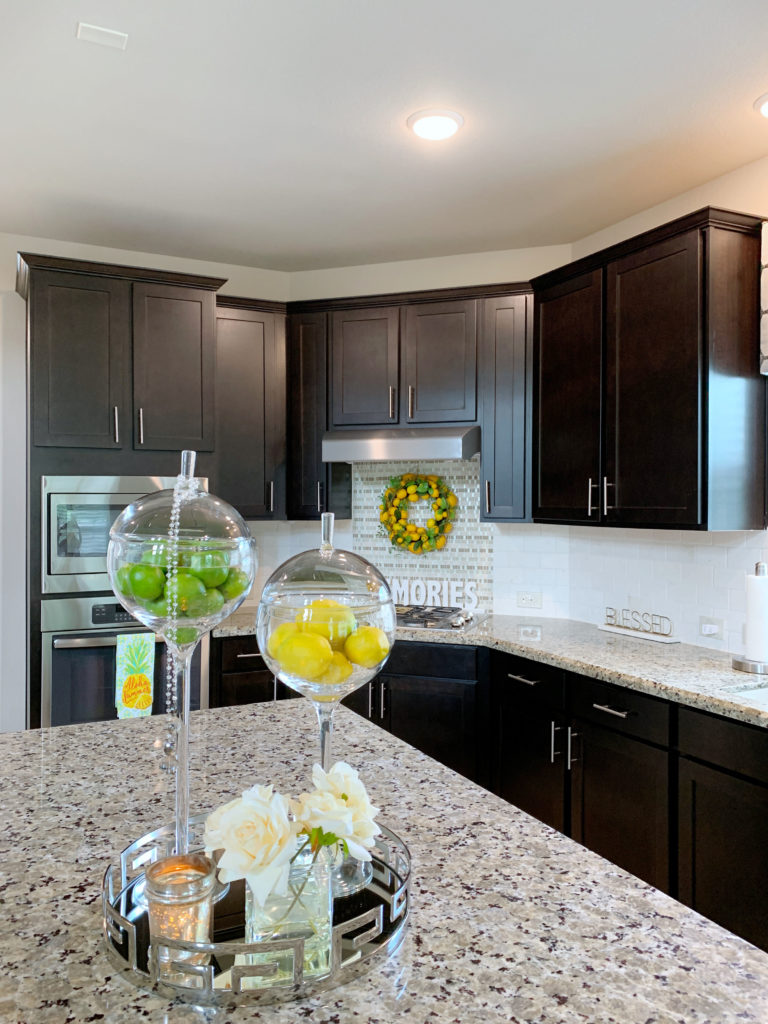
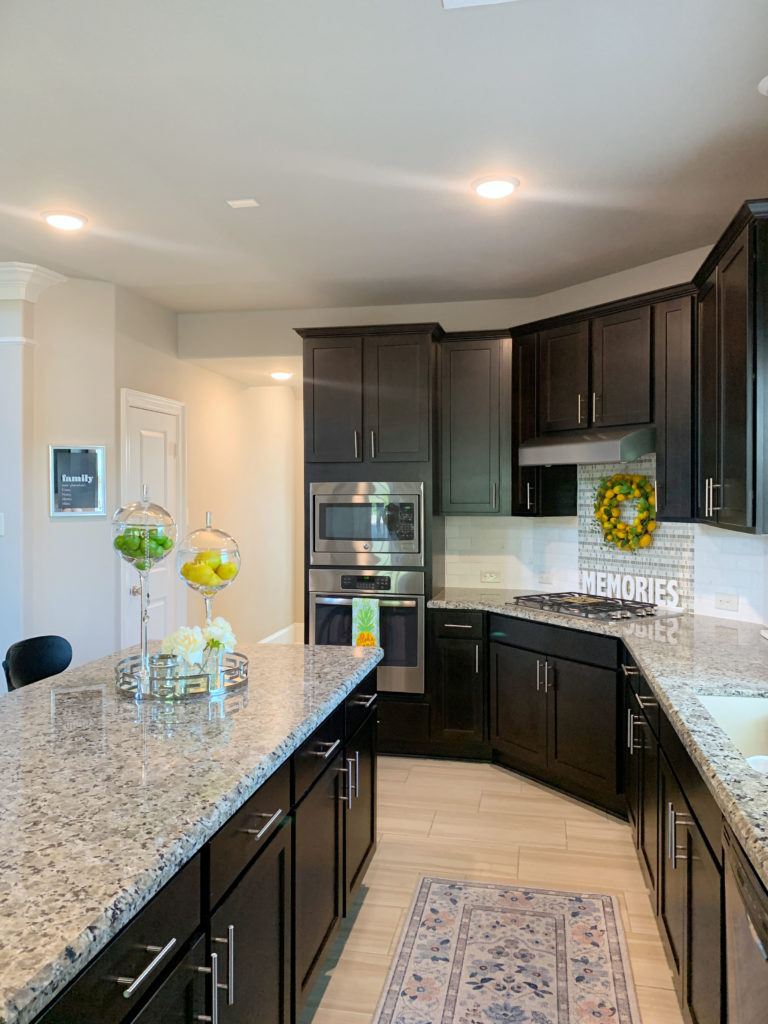
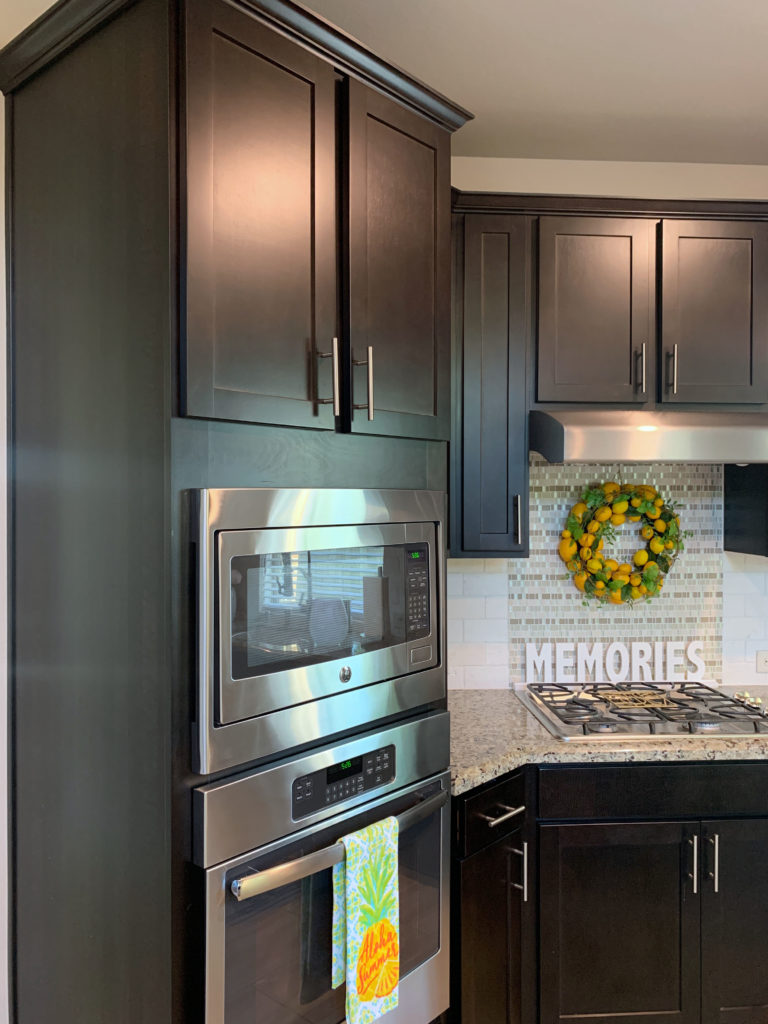
This post is for all my ‘espresso gang’! I’ve gotten so many questions about how to clean espresso cabinets, so I’ve decided to just do a post about it. This way, I can easily refer new members of my community here. Even though I’m sure the method I’m sharing can work on other cabinet finishes, I will speak on what I know!
This post contains affiliate links. All opinions are my own.
First off, espresso cabinets were not on my list of must haves when we were house hunting. Matter of fact, they were the last things I wanted *inserts crying face*. I really really wanted white cabinets, until I saw a model home with grey cabinets. Now, I am obsessed with grey! If we were supposed to change out our cabinets to grey or white, I would need new countertops, and backsplash, but since money doesn’t grow on trees I will just appreciate what I have. Us humans always want what we don’t have, but such is life! With that said, I’ve grown to love my espresso cabinets, for now. I have them in my kitchen, my homework area, and in my bathrooms.
Ok, now back to how to clean espresso cabinets. First, I use a swiffer duster to remove any loose dust (I do this so that when I’m wiping with a damp cloth it doesn’t spread dirt all over the cabinets). Then, I get a microfiber cloth and damp it with soap and warm water. I normally use dishwashing soap. If the cabinets are dirtier than usual (you know we skip out on deep cleaning sometimes, lol), I would wipe them down a second time. Lastly, I use a dry microfiber cloth to remove any water marks, and voilà!
*Side note* I remember the first time I cleaned them using pledge furniture polish #dojudge. OMG, it was the worst idea ever. My cabinets have a semi-matte finish so you can just imagine what the furniture polish made them look like 🙁
I’ve also heard about vinegar and water, but I haven’t tried that method. Soap and water works perfectly for me. I hope this ‘How To Clean Espresso Cabinet’ method works to you too. Like what you read? Drop a comment below 🙂
You can find granite and stainless steel cleaners here under “cleaning products”.
Don’t forget to subscribe to my blog! Also, get to know more about me here.
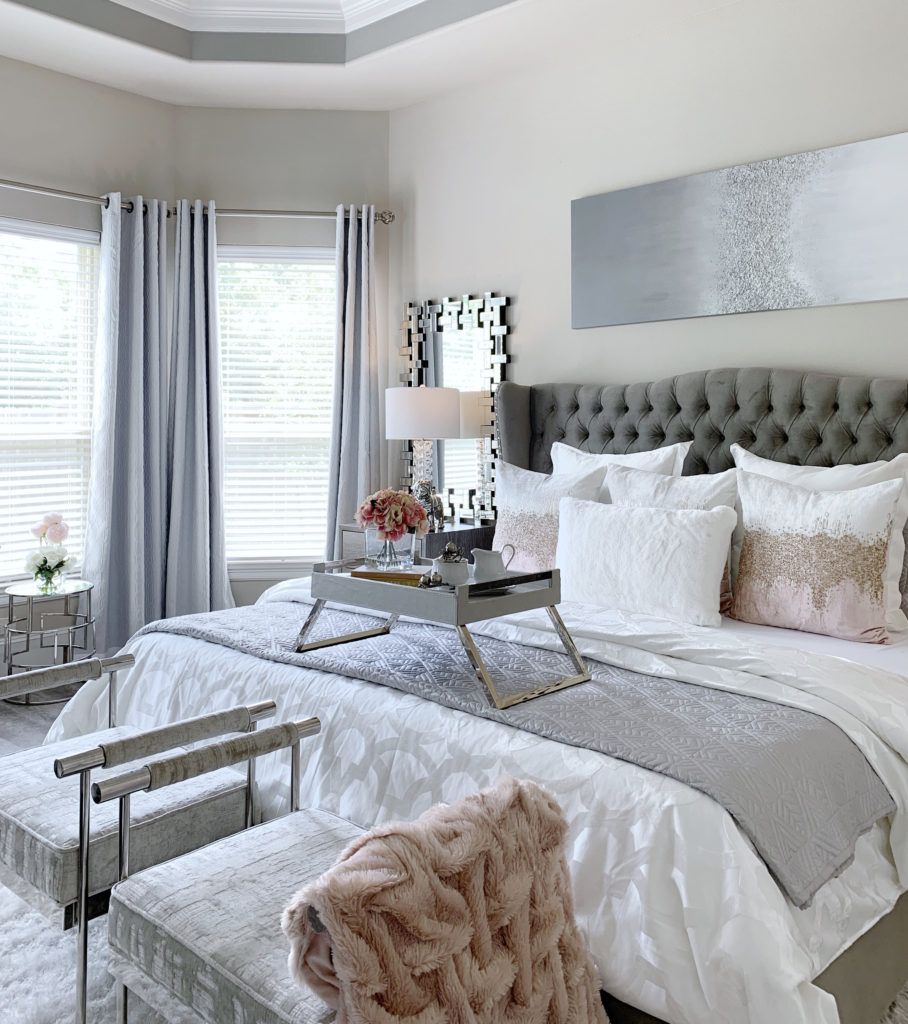
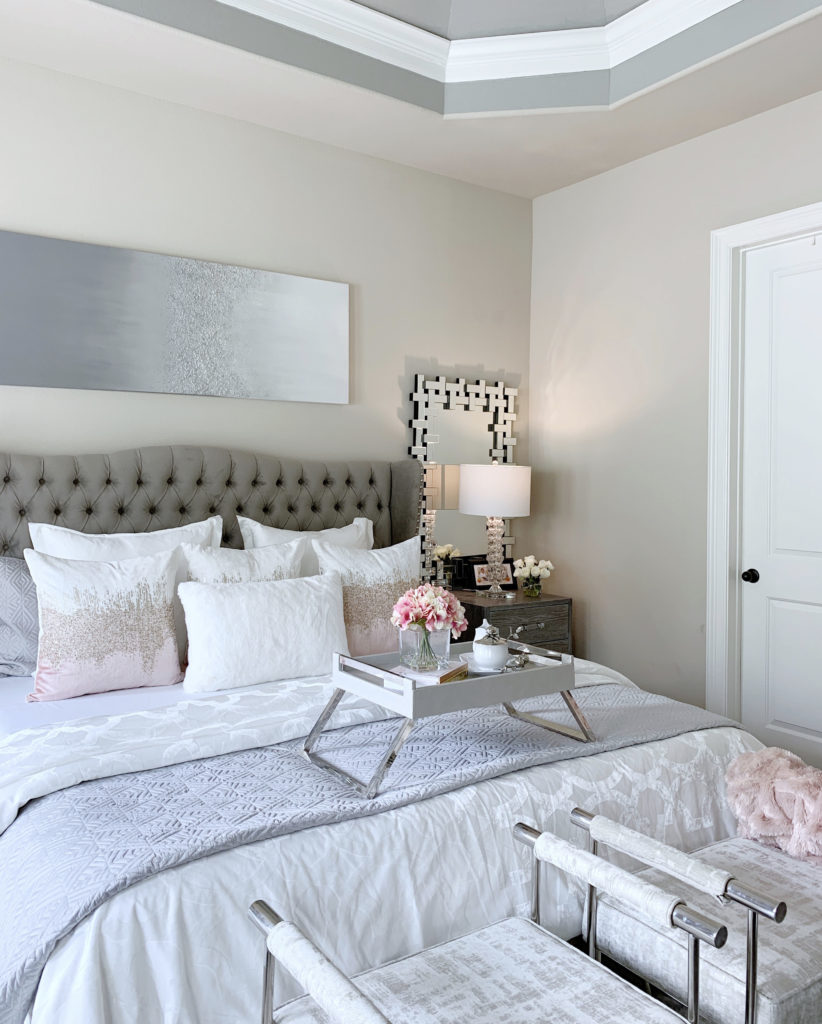
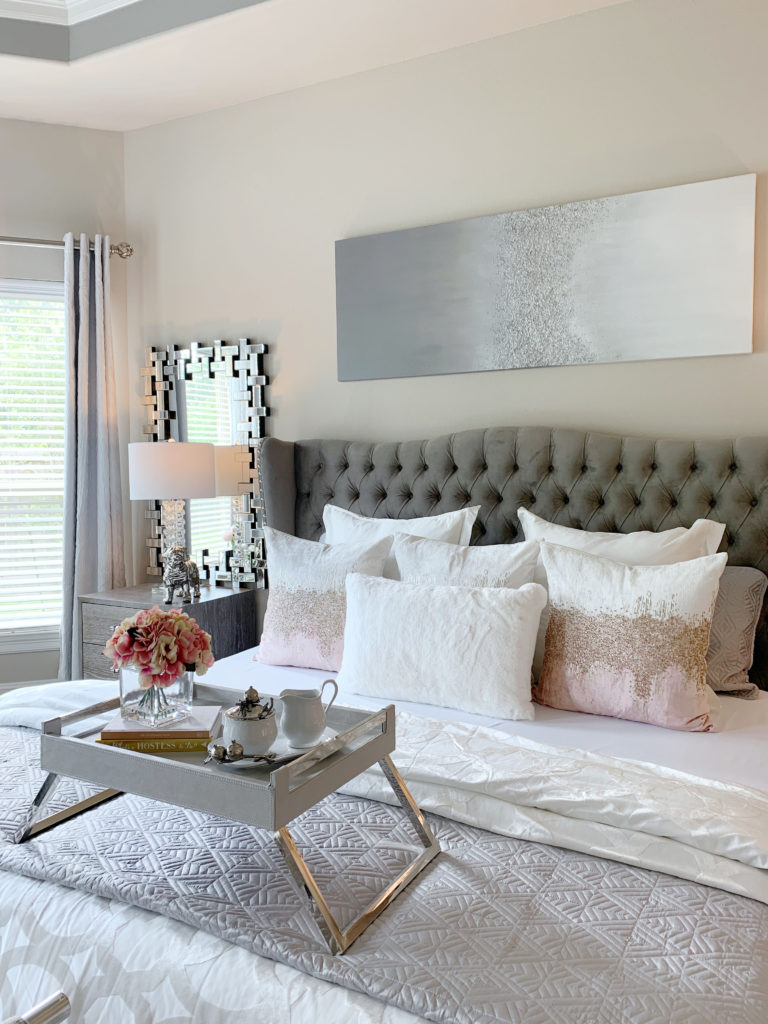
Welcome to my first ever Blog Post! OMG how exciting! I’m happy to be writing my first blog post in collaboration with one of my absolute favorite stores. I’ve teamed up Z Gallerie to share one key bedroom design tip with you.
This post contains affiliate links. All opinions are my own.
Do you love changing out things in your bedroom as much as I do? If the answer is yes, one key bedroom design tip is to invest in a good set of neutral bedding. This way, you can easily change out the pillows and throw blankets to add a Pop Of Color, or decorate for each season. Z Gallerie has a few neutral bedding options, but my favorite is the Edessa bedding, in pearl. It is gorgeous, the quality is amazing, and it’s extremely affordable. Even if your answer is no, owing a set of neutral bedding is not a bad idea, don’t you agree?
I don’t know about you, but I do not have a ton of storage for all of the big and bulky comforters, quilts, and blankets. This key bedroom design tip has been instilled in me ever since I started living on my own. I remember living in a small apartment in NYC, where I could only have one bedding at a time and I always choose to purchase neutral beddings. Even now that I own a home, I’m limited on storage space because I have way too many pillows to store (hope the hubby won’t read this, lol). Speaking of pillows, all of these beautiful pillows are also from Z Gallerie. I’m so obsessed with their pillows!
Here, I’m using the Solange Euros, the blush Joie De Vivre, and Geneva Snow lumbarpillows which are all from Z Gallerie. A beautiful quilt, a bed tray, and some floral arrangement completed the look. I hope this key bedroom design tip was helpful, and I hope you enjoyed reading my first blog post.
Visit my about page to read a little about me! Please subscribe to my blog so that you will never miss out on a post! Also, follow me on Instagram and liketoknow.it app.